Azure AD Connect - Filtering in User Synchronization
An explanation of filtering options in Azure AD synchronization. A demonstration and deep-dive into sync rules determined by user attributes, such as group membership or account settings.
Introduction:
More and more companies are moving their servers and services to the cloud. Some migrate everything to the cloud, while others move to a hybrid model.
One of the most fundamental and widely used tools in enterprise network management is Active Directory. Its modern form - Azure Active Directory - is a versatile and powerful tool for secure identity management and user authentication across a large number of other services, whether On-Prem or hosted by neighboring providers such as Google Cloud Platform, AWS, Webex, ServiceNow, and many more.
When using the hybrid Active Directory model - On-Prem together with Azure Active Directory - the connectivity between the cloud service and the On-Prem service is a critical link.
Healthy operation of the Azure AD Connect component keeps all services running correctly. When this component malfunctions or is misconfigured, a large number of issues and security risks can follow.
Below I will briefly review several ways to manage synchronization.
This article is written for those already operating in a hybrid configuration with an active Azure AD Connect component. Explaining the initial installation and configuration of a hybrid connection would require a separate series of articles.
Service accounts:
Every organization maintains in its Active Directory a list of users used to run various services and applications, scheduled tasks, and more. By nature these accounts are more sensitive - in some places their passwords are changed infrequently. In environments with stronger security enforcement, these accounts are hardened so they cannot be used to log in as a regular user through a desktop or server UI (or RDP), but only as a Service or Batch job.
For this reason, such accounts almost always should not be synchronized to Azure Active Directory.
The same can be said for most test accounts, accounts created to serve as distribution mailboxes, and so on - in short, any account that does not directly represent an employee of the organization.
Azure AD Connect - Components:
A brief overview of the product’s components, which connect and synchronize between On-Prem Active Directory and the managed cloud service.
Three components appear on the server where the product is installed and managed:
-
Azure AD Connect
-
Synchronization Rule Editor
-
Synchronization Service
 AD-Connect components
There are also additional tools such as the Web Service Configuration Tool, but I will not cover everything in this article.
Azure Active Directory Connect:
This is the main configuration wizard for the service.
 General settings for AD-Connect
Here you can configure which Azure Active Directory domain to connect to, which attributes of each account will be synchronized, and which OU from the Active Directory structure will synchronize to the cloud (this did not work very well in my experience), and so on.
Important to remember!
While this window is open, the synchronization service is suspended and will not run until the window is closed. Anyone who opens the wizard to review settings, or who starts a configuration process and decides to finish later, should take this into account and close the wizard as quickly as possible to restore the service.
This applies regardless of which step the window is on. As long as this specific component - Azure Active Directory Connect - is open, the synchronization service is not running.
Synchronization Rule Editor:
This component defines the synchronization logic: how each account type synchronizes, how certain On-Prem attributes pass to the cloud, and how they sometimes change name and format during the transition - since an attribute may have one name On-Prem and a different name in the cloud.
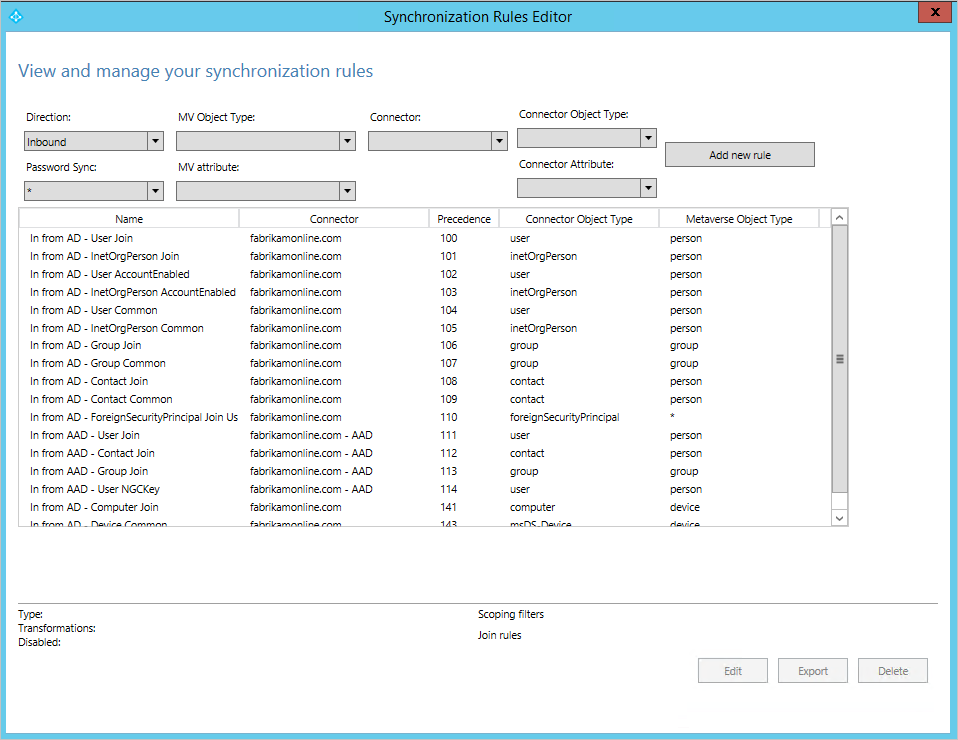 The AD-Connect synchronization rule set
This is also where you can define rules for filtering out users so they do not synchronize to the cloud, based on specific attributes - such as membership in a particular group, a specific username, or any other value.
Synchronization Service Manager:
This component handles the operational side.
Here you can initiate manual synchronization operations or monitor regular scheduled sync activity. You can also identify synchronization errors or find objects in the On-Prem Active Directory cache or the cloud cache.
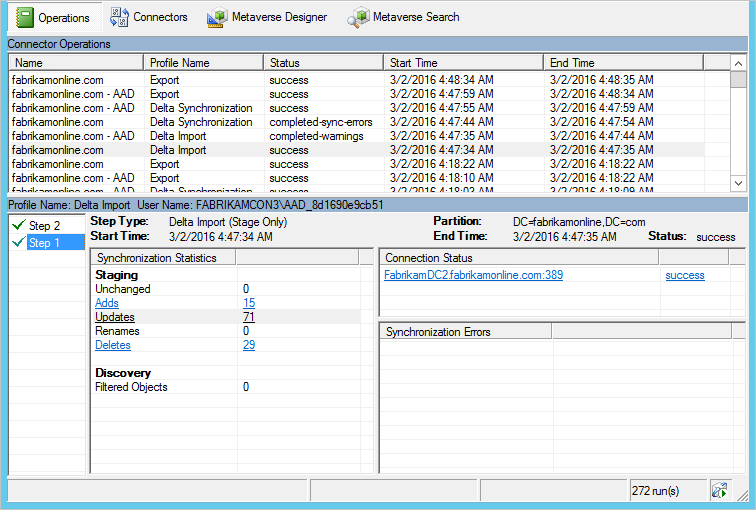 Operational sync management and monitoring
As you can see in the image, there are 4 main tabs.
Operations - This is essentially an activity log. Here you see regular sync activities, when they occurred, what happened in each one, and so on.
Connectors - These are endpoints. In a typical organization there will be two - one On-Prem and one in the cloud. They synchronize data with each other according to the rules and settings defined for them in AD Connect or in Azure settings.
Clicking on any Connector lets you choose to manually trigger operations such as import, export, delta sync, full sync, and so on.
You can also clear the cache of a given Connector. This action is performed when certain sync errors keep repeating with no apparent justification - something appears to be stuck in the cache.
The other two tabs relate to the configuration of the synchronized attributes, how they appear in the cache, and how to search for objects in the cache by those attributes.
I will not dwell on those - I will only note that I have personally used them only for troubleshooting sync errors.
A sync filtering rule:
As mentioned above, we often want to filter certain users from synchronizing to the cloud. This can be done based on group membership or on other attributes. Here I will explain how to perform the filtering and what rules govern it.
As noted earlier, the Azure AD Connect wizard does offer an option to synchronize only specific OUs from Active Directory. But in my experience this causes many issues and disrupts the entire sync. Here we will use synchronization rules to perform the filtering instead.
Before editing sync rules it is advisable to disable the regular scheduled sync operations. You can open PowerShell as Administrator on the server where the product is installed and enter the following command:
Set-ADSyncScheduler -SyncCycleEnabled $falseThen open the Synchronization Rule Editor component and click “Add new rule” in the top right corner.
Before doing so, you might want to review the existing rule list. Notice that some rules apply to users, some to groups, some export from On-Prem to the cloud, and others in the reverse direction. All rules have a Precedence value that determines the order in which they are applied. By default they start at 100 and go up, with 100 being first in order.
Here we will focus on filtering from On-Prem to the cloud, and specifically filtering users. We will therefore create a rule and assign it a precedence lower than 100 so it applies first and filters out everything we do not want to synchronize.
When you click “Add new rule”, a wizard window opens to define the rule. The wizard contains four tabs.
Description:
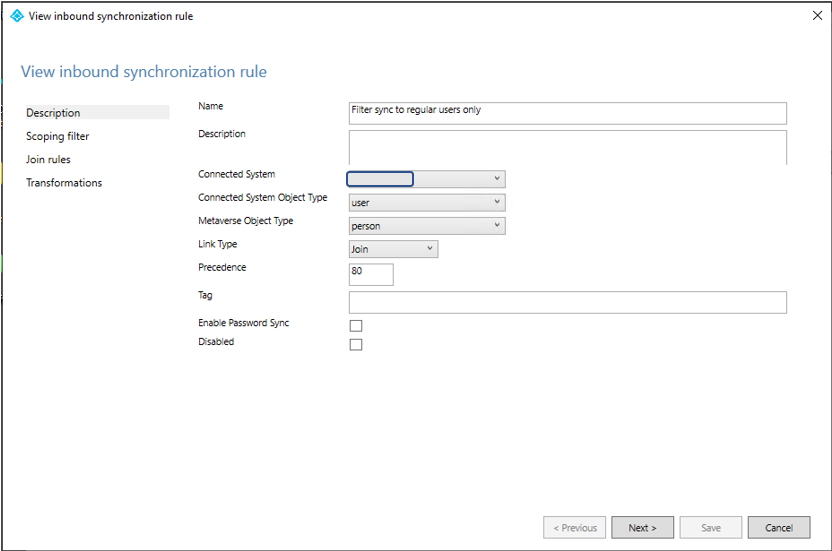 Initial information and settings for a sync rule
Connected System - Here you define what the rule applies to - which Connector. Select On-Prem.
Connected System Object Type - What type of object in that Connector the rule applies to. Since this is On-Prem, select User.
Metaverse Object Type - How the object is translated and mapped when it is loaded into the cache for processing. In this case - person. When data is pulled from On-Prem, within the AD Connect process, a User becomes a Person.
Lynk Type - Which operation the rule should govern. Select Join.
Precedence - As noted above, choose a number lower than 100 so this rule applies before all others. You can use 50, 80, or 20.
Click Next.
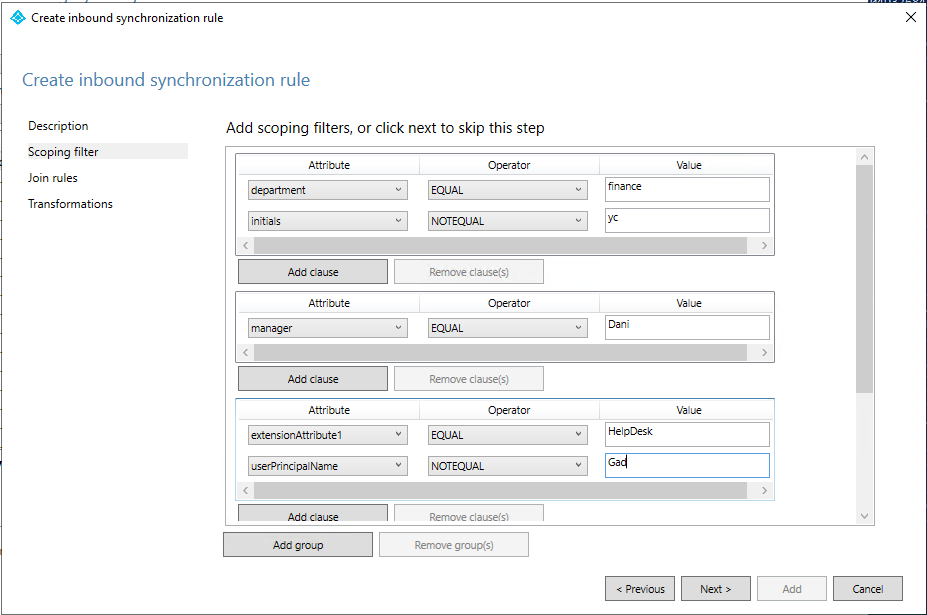
Scoping filter:
In this tab you define who the rule applies to. If the previous tab defined that the rule applies to users synchronizing from On-Prem to the cloud via a Join operation, this tab defines which users among them the rule targets.
 Account filtering for sync
As you can see, this tab lets you add groups and clauses. A group can contain multiple clauses.
The logic works as follows:
Each clause is a condition. The rule applies to everything that matches that condition.
Clauses within the same group operate with AND logic - for the rule to apply to a user, all clauses in that group must be true for that user.
But groups operate with OR logic - for the rule to apply to a user, at least one group must match.
Example from the screenshot:
There is a first group. It contains a clause stating that the rule applies to anyone in the finance department - or more precisely, anyone whose Department attribute in Active Directory contains the value “finance”.
However, because there is another clause inside the same group, the rule does not apply to everyone in finance. In fact, the rule applies to someone who is both in the finance department AND whose initials are not “yc”.
But there is a second group. Someone outside of finance could also be covered by the rule - for example, if their manager is “Danny”.
You can configure things so that everyone who is a member of the HelpDesk group has that value written to an extensionAttribute (or any other value you can define by editing the Active Directory Schema). You can then set the rule to apply to all HelpDesk members except a person named “Gad”.
So who does the rule apply to?
Members of the finance department - except the person whose initials are “yc”.
Or anyone whose manager is Danny.
Or anyone who is a member of HelpDesk and whose name is not Gad. - This assumes the group value was written to that Attribute!
Join rules:
Since this is a rule for filtering users - meaning the rule is intended to prevent objects from performing a Join - no values are entered in this tab.
Transformation:
This tab defines what happens to everyone the rule has applied to so far. In our case, we want to specify that anyone covered by the rule will not synchronize to the cloud. Enter the following values:
 AD-Connect - Transformation
Then click Save and the rule is saved.
Now return to PowerShell and enter the following command:
Set-ADSyncScheduler -SyncCycleEnabled $trueThis restores the regular synchronization schedule.
Deletion threshold:
Activating this rule will prevent future synchronization of users matching the defined conditions and will delete from Azure Active Directory any such users that already exist there.
Activating such a rule can trigger the modification and deletion of a large number of objects. This needs to be taken into account and the implications must be understood.
To prevent accidents where a large number of objects are deleted from the cloud, a default threshold is configured. When that threshold is reached, no additional objects will be deleted until the next sync.
The default value is 500.
You can retrieve the configured value by entering the following command in PowerShell:
Get-ADSyncExportDeletionThresholdIf you are applying a new rule or want to delete a large number of objects under other circumstances, you can disable the threshold with the command:
Disable-ADSyncExportDeletionThresholdAnd if you want to restore the threshold or change it to a different number (I set it to 20), use the following command:
Enable-ADSyncExportDeletionThreshold -DeletionThreshold 20User Account Control:
Another useful attribute to filter by is UserAccountControl. This attribute always contains a numeric value - and there are many possible values it can hold.
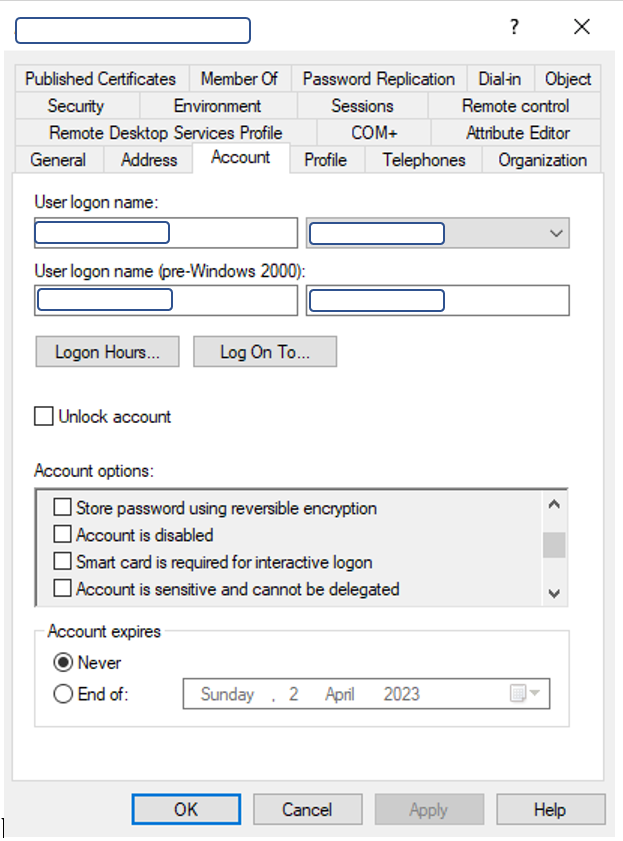 User account - Account tab
On the Account tab of an Active Directory user account, there are various checkboxes in the lower section - such as password never expires, user cannot change password, Kerberos encryption options for this account, and so on.
For an average user the value is 512. But there are so many options, and the value is determined by which items in the list are checked or unchecked. Everything is calculated into a final number, and that is the value of UserAccountControl.
This allows you to define a rule that filters users for whom this attribute contains the value 66048 - which represents a user whose password never expires. Just as an example.
The sync cycle:
In the configuration wizard you can set how often synchronization runs. The default is every 30 minutes.
A new object or a change is only picked up and moved from On-Prem to the cloud after 2 sync cycles. In the first sync the change is registered; in the second sync the change is confirmed and appears in full.
For example - a new user created On-Prem will appear in Azure Active Directory within 31-60 minutes, depending on when the last sync occurred.
If a new user was created and you do not want to wait, or you want to trigger a manual sync, there are two options:
- Single-object sync. Run the following command in PowerShell:
Invoke-ADSyncSingleObjectSync -DistinguishedName "CN=user,OU=finance,DC=comp,DC=com"One thing to keep in mind: this is a single-object sync. The user themselves will synchronize, but since the groups they belong to are not being synced, they will appear in the cloud with an empty group membership list.
- Manually trigger a sync/export from within the Synchronization Service Manager.
As noted, you need to sync twice before seeing the desired object in the cloud.