Technical: Monitoring and Automation in the Cloud
A technical guide for building a cloud-based monitoring and automation system in a GCP environment. The system runs tasks on containers, with some tasks concluding by sending a report by email.
Monitoring, Reports and Automation in a Cloud Environment - Technical Guide
In the previous article, the process was explained that combines several different cloud components into a process that can provide system administrators with feedback and alerts. The article explained the architecture and stages of the process. The following article explains in detail the technical process of actually building the system.
Overall, the process is divided into two parts:
-
The GCP side, where the infrastructure and components to be monitored live, and where the monitoring process also runs.
-
The Azure side (as SaaS services) through which monitoring results and alerts are sent by email.
Here I present as an example the procedure for sending email via Exchange Online. Any organization that holds Microsoft 365 subscription accounts and Entra ID (Azure Active Directory) identities, can use this configuration for mail sending. But it’s also possible to use a similar idea (with changes to the template) to send mail via the API of other mail providers, such as Gmail.
Automated email sending through Exchange Online must go through Microsoft’s API. This involves secure authentication processes such as OAuth2, and then sending the email in a very specific format.
First we’ll prepare the components on the Azure side, so they’re ready to accept requests and integration when we configure and activate the GCP side.
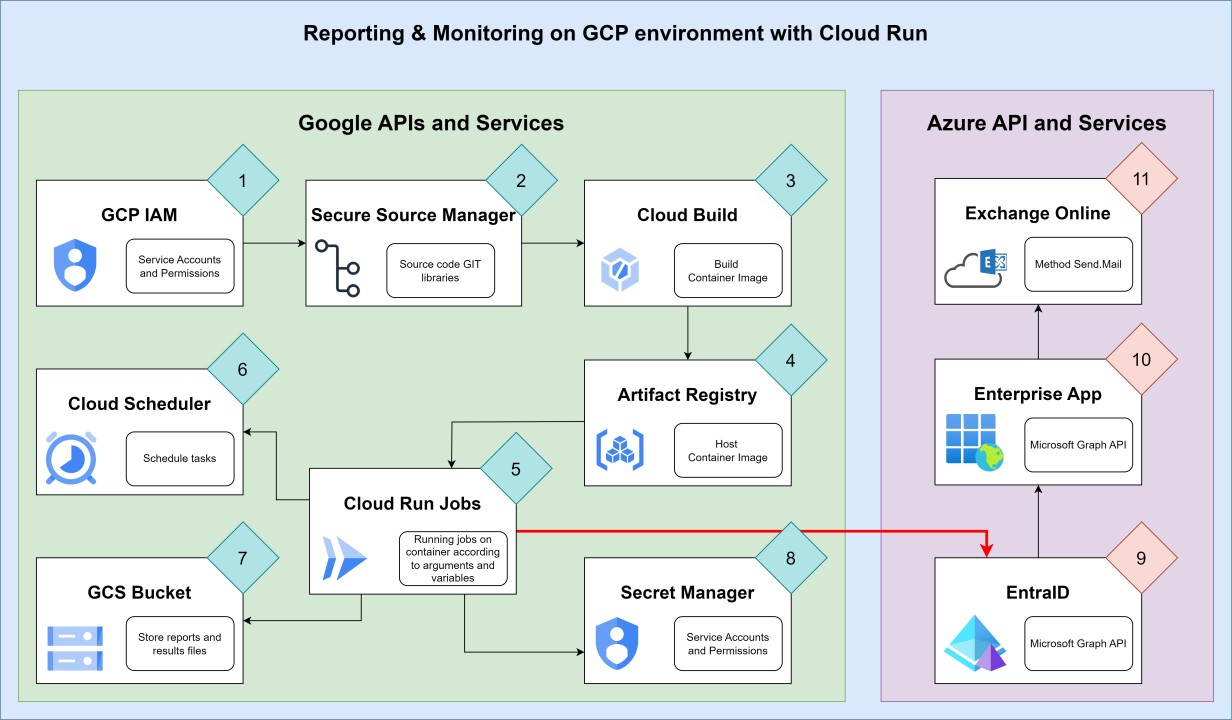
System architecture diagram
Entra ID (Azure Active Directory):
This step depends heavily on the nature of the licensing and working configuration with Microsoft 365 systems. It could be a hybrid configuration where there is an on-premises Active Directory syncing to Azure Active Directory. There might be on-premises mail servers, perhaps it’s hybrid, or perhaps there’s nothing on-premises and everything runs exclusively through Microsoft 365.
The ultimate goal is to have an existing user in Entra ID with a mailbox in Exchange Online (not an on-premises mailbox in a hybrid service).
We’ll call the user gcp-monitor-mail@example.com.
Of course, Example.com needs to be replaced with the actual domain name being used.
Enterprise Application:
-
In the Entra ID management panel, find Enterprise Applications.
-
Click the + New application button at the top.
-
In the page that opens, click + Create your own application at the top again.
-
In the side panel that opens, give it the name - GCP-Mail, then select the bottom option - Integrate any other application you don’t find in the gallery.
-
Click Create.
App Registration:
-
In the Entra ID management panel, go to App registration.
-
In the page that opens, note that there are 3 tabs. We’ll be in the middle one - Owned applications. Switch to the left tab - All applications.
-
Enter the GCP-Mail application.
-
When entering, you arrive at the application’s initial page - Overview. There you’ll see several rows with the application’s details. Copy 2 fields and save them aside: Application (client) ID, Directory (tenant) ID.
-
Go to the API permissions blade.
-
Click + Add a permission.
-
In the side panel that opens, select the top option - Microsoft Graph.
-
Two options will appear. Select the right one - Application permissions.
-
A list of permission groups will appear. Type mail.send in the search. Only the “Mail” permissions group will be shown. Open it and check the Mail.Send permission, then click “Add permissions” at the bottom.
-
Now you’ll see that the permission appears, but in the Status column there is a warning sign. Click “Grant admin consent” at the top. This is to the right of the + Add a permission sign.
Issuing a Token:
-
Still in App registration, go to the Certificates & Secrets blade.
-
Click + New client secret.
-
You can give a description such as “Secret for sending mail” - not required. Choose the expiry time for the secret. Preferably 3-6 months. Click Add at the bottom.
-
The secret will appear in the list, and only this first time - immediately after creating it - we’ll be able to see its Value and copy it. Copy and save it aside.
Hardening:
Now, using those Client-ID (App ID) and Client-Secret, it’s possible to send mail on behalf of any user who has a mailbox in Exchange Online. For information security reasons, we want to restrict the ability to send mail in this configuration to only selected users.
This hardening will be performed using Exchange Shell commands from Exchange Online.
First, connect to it using the following command:
Connect-ExchangeOnlineNaturally we’ll need to go through the secure authentication process, after which we can perform operations via commands. Then we can enter the following two commands:
New-DistributionGroup -Name "Mail-Graph" -Type "Security" -HiddenFromAddressListsEnabled $true -Members @("gcp-monitor-mail@example.com")

New-ApplicationAccessPolicy -AppId <APP ID> -PolicyScopeGroupId Mail-Graph -AccessRight RestrictAccess
The first command creates a group into which we place the user designated to send emails in this configuration. The second command creates a rule that only members of that group can use the application we created to send mail. You can add the Description flag to each of these commands, in case someone in the future encounters the group or rule and tries to understand what we did there.
- Azure side preparation is now complete. Moving to the GCP side.
IAM:
-
Create a service account named monitoring-jobs.
-
Grant it the Cloud Run Service Agent role at the project level.
-
Copy the full name (email format) of the account and set it aside.
Later we’ll give it granular permissions for other resources.
-
Create a service account named custom-build.
-
Grant it the Cloud Build Service Account permission at the project level.
-
Copy the full name of the account and set it aside.
For the more advanced practitioners, I would recommend replacing the general Cloud Build Service Account permission with the following trimmed permissions list:
- cloudbuild.builds.create
- cloudbuild.builds.update
- cloudbuild.builds.list
- cloudbuild.builds.get
- cloudbuild.workerpools.use
- logging.logEntries.create
- logging.logEntries.list
- logging.views.access
- pubsub.topics.create
- pubsub.topics.publish
As mentioned, this is for the more advanced. It’s possible that tomorrow or the day after this will change, and to run a basic Build an additional or different permission will be required. Also, it depends on the configuration used to run the Build. You can always give a permission to an account for a specific resource rather than at the project level - that’s far more secure.
Secret Manager:
-
In the GCP management panel, click the three lines at the top left for a menu. There, under Security, click Secret Manager.
-
Anyone using this product for the first time in that project will need to enable it - click Enable API and continue.
-
Click + CREATE SECRET.
-
Give it a name - graph-app-secret.
-
In the Secret value field, paste the Secret we created in the GCP-Mail application in Entra ID Enterprise Applications.
-
Check the Manually manage locations for this secret box, and in the pop-up menu choose the Tel Aviv region.
-
You can check and set an expiry. Those who do can create a script that runs every week and warns before the Secret expires, so they can issue a new one in the Azure application and replace it in Secret Manager.
-
Click CREATE SECRET at the bottom.
Permissions:
After we have a Secret, give the service account we created earlier permissions to read it. This way the scripts that run will be able to connect to other resources securely, without storing passwords in the code.
- After creating the Secret, navigate to its page. If not there, click on it to enter.
- Go to the PERMISSIONS tab.
- Click GRANT ACCESS at the top.
- A right-side panel will pop up. In the New principal field, paste the email of the service account we created.
- Click Select a role field and in the pop-up search type “Accessor”. This will bring up the permission we need - Secret Manager Secret Accessor. Select it.
- Click SAVE.
Storage Bucket:
Often we want to store results of reports and monitoring. We can store files in different places according to classification. For example - a bucket for GCP cloud infrastructure report files, a bucket for Active Directory environment report files, a bucket for other tasks, and so on.
Through division into buckets, we can manage the entire bucket using one unified permissions system, and grant access to a bucket for a specific service account that performs the same operation.
This way, a service account with monitoring (or even configuration change) permissions in GCP has no permissions for the Active Directory environment or result files. An account running scripts on Active Directory lacks permissions for GCP systems or the report files generated for it.
In this way, if a password or something similar is needed for script purposes, it’s stored in separate Secrets under Secret Manager.
Just remember that all service accounts running a process that ends by sending an email all need access to the Secret of the email-sending application in EntraID.
So let’s create a bucket for GCP environment report files:
- In the GCP management panel, click the three lines at the top left to open the main menu, then click Cloud Storage.
- On the Cloud Storage page, click CREATE at the top.
- Give the bucket a name - keep in mind that every bucket gets a name unique across all of GCP. If someone somewhere in the world has already chosen that name, you can’t. For demonstration purposes I’m using the name yostest-monitoring-gcp. Click CONTINUE.
- Now choose where the bucket is stored. Choose Region in the Tel Aviv area - me-west1. Click CONTINUE.
- Storage Class - leave this as regular. Click CONTINUE.
- As explained above, the preference is to manage one unified permissions system for the entire bucket. Permission separation will happen at the bucket level, and anything needing separate permissions will be in a separate bucket. So in the next step choose Uniform Access control, then click CONTINUE.
- Now choose whether we want to define ways to protect files from deletion and changes. In this case, defining a Retention of one year at the bucket level seems right. Most reports (at least as I’ve written them) produce lean CSV files, and in most cases the filename carries a timestamp - so a new report won’t overwrite the old one.
- Click CREATE. In the pop-up panel, confirm enforcement of public access prevention.
Time-Limited Storage:
Earlier we defined that every file uploaded to the bucket is protected for one year and can’t be deleted. Now we want to define that after one year the file will be automatically deleted.
We can also give different folders to different types of files, some deleted after one year and some after three years.
- The bucket page will now open, click CREATE FOLDER. In the pop-up panel, enter the name instance-report. Confirm and create.
- Go to the LIFECYCLE tab. There you set rules defining what to do with certain files after a certain period.
- Click ADD A RULE.
- Under Select an action, choose Delete object. Click CONTINUE.
- Since we earlier defined a Retention at the bucket level, we can’t delete files before a year has passed. But we can decide that some stay for more than a year. In that case, check Object name matches prefix as the Rule Scope. Then place files for each report in a different folder - the folder name becomes the Prefix that determines when objects in it are deleted. For now, set the Scope to objects whose path contains the string ‘instance-report’, which is the name of the folder we just created for that report’s files.
- Further down is Set Conditions. Check Age and enter 370. Files will be deleted after 370 days.
- Click CREATE at the bottom.
Permissions:
- Go to the PERMISSIONS tab.
- Click GRANT ACCESS.
- Give the monitoring-jobs user created earlier the Storage Object User permission.
- Confirm and close.
Monitoring Scripts:
The core of the process is scripts that can collect data about the cloud environment, process it and update us on the situation. So before anything we need to define objectives. Scripts that could be written include:
- List of active machines - project, machine size, disk sizes, internal and external addresses, etc.
- All disks not attached to any server - isn’t it wasteful to pay for storage for nothing?
- List of IP addresses not connected to any machine.
- Storage buckets open for public access.
- Users with administrative permissions across all projects.
- Kubernetes cluster data.
- Changes to machines - such as start, stop, disk added, disk expanded, IP addresses added and removed, etc.
The list of possibilities is long, and here I’ll present 3 scripts as examples - a POC.
I’ll present the first script now, the last two will appear at the end as Appendix A and B.
The script will be saved as a PowerShell file - InstanceReport.ps1.
Script - List of Active Machines:
$file = "InstanceReport-" + (Get-Date).ToString("dd-MM-yyyy") + ".csv"
$projects = gcloud projects list --format=json | ConvertFrom-Json
$list = @()

# Loop over all projects to get VM info of all VMs.
foreach ($x in $projects.projectId) {
    $vms = gcloud compute instances list --format "json"  --project=$x | ConvertFrom-Json
    $disks = gcloud compute disks list --format "json"  --project=$x | ConvertFrom-Json

# Set, add and modify attributes names with the desired format for the report.
$selected = $vms | select @{N='Name' ;E={$_.name}},
@{N='Project' ;E={$x}},
@{N='Zone' ;E={$_.zone.split("/")[-1]}},
Description,
@{N='Env' ;E={$_.labels.env}},
@{N='Product' ;E={$_.labels.product}},
@{N='Role' ;E={$_.labels.role}},
@{N='MachineType' ;E={$_.machineType.split("/")[-1]}},
@{N='NIC' ;E={$_.networkInterfaces.name -join ","}},
@{N='IP' ;E={$_.networkInterfaces.networkIP -join ","}},
DiskName, DiskSize, DiskType,
@{N='OS'; E={
    # Assuming a simple metadata key or image naming convention for OS type. This is a placeholder and needs adjustment.
    if ($_.metadata.items -match 'windows') { "Windows" } else { "Other" }
}},
selfLink

    # Attached disks info which is not included in VM metadata.
    foreach ($y in $selected) {
        $y.DiskName = ($disks | ?{$_.users -eq $y.selfLink}).name -join ","
        $y.DiskSize = ($disks | ?{$_.users -eq $y.selfLink}).sizeGb -join ","
        $y.DiskType = (($disks | ?{$_.users -eq $y.selfLink}).type | %{$_.split("/")[-1]}) -join ","
    }

    $list += $selected | Sort-Object -Property Product
}

$list | select -Property * -ExcludeProperty selfLink | Export-Csv -NoTypeInformation -Encoding UTF8 -Path ("/tmp/" + $file)
gsutil cp ("/tmp/" + $file) gs://reports-bucket-org/VM-Changes

"<h2>Detailed list of all VM's in the organization</H2>" | Out-File /tmp/mail-body

# ====================================================================

# Configure mail attributes

$mailElements = '' | select To, Cc, Subject, Attachments

$mailElements.To = "recipiant@example.org"
$mailElements.Cc = "cc@example.org"
$mailElements.Subject = "Instance Report"
$mailElements.Attachments = $file

$mailElements | Export-Csv -NoTypeInformation -Encoding UTF8 -Path /tmp/mail-elements.csv

/infrastructure-jobs/Send-Mail.ps1
Brief Script Explanation:
Up to line 36, the script collects a list of all projects. A loop goes through them one by one and takes lists of the virtual machines. The process then processes their attributes into a data table in the format we want.
In lines 38-39, the table is exported as a CSV file and copied to a storage bucket.
From there, there is preparation to send an email in a very specific format. Text in some format goes to a file that will contain the email body. Addresses for recipients, the email subject and a field for the name of an attached file go into a CSV template.
Then a call is made to a separate script that performs the email sending according to the data defined in these two files.
Sending the Email:
As mentioned, we chose to send emails via Exchange Online. The email can be sent in several formats. Among the options, we send the email as JSON. For this purpose we’ll need to go through a process that builds the JSON according to the email data and content, as well as managing the secure connection to the API called Microsoft Graph.
Building the JSON Template:
To start, we’ll create a general template for that JSON:
@{
    message = @{
        subject = $mail.Subject
        body = @{
            contentType = "HTML"
            content = $msg
        }
        toRecipients = @(
            @{emailAddress = @{"address" = to}}
        )
        ccRecipients = @(
            @{emailAddress = @{"address" = cc}}
        )
        from = @{emailAddress = @{"address" = "reporter@example.org"}}
        attachments  = @(
            @{
                "@odata.type"  = "#microsoft.graph.fileAttachment"
                name           = filename
                contentType    = "text/csv"
                contentBytes   = $global:attachments[num]
            }
        )
    }
}
We’ll save this template as a file named msg-template.txt.
Explanation:
This template contains the main fields in the email JSON, and we need to update the fields according to the email we want to send.
Building, Processing, Connecting and Sending:
The following script performs the entire process:
# Functions to insert variables to the mail templates

function Set-Mail-Addresses {
    param ($addr)
    for ($i = 0; $i -lt $addr.split(",").Count; $i++) {
        $row = $template[8].Replace("to", ('"' + $addr.split(",")[$i] + '"'))
        if ($i + 1 -lt $addr.split(",").Count) {$row = $row + ","}
        $global:message += $row
    }
}

function Set-Mail-Attachments {
    param ($filename)
    for ($i = 0; $i -lt $filename.split(",").Count; $i++) {
        $location = ("/tmp/" + $filename.split(",")[$i])
        $file = Get-Content -Path $location -AsByteStream -Raw
        $global:attachments += [System.Convert]::ToBase64String($file)
        $global:message += $template[15..16]
        $global:message += $template[17].Replace("filename", ('"' + $filename.split(",")[$i] + '"'))
        $global:message += $template[18]
        $global:message += $template[19].Replace("num", $i)
        $row = $template[20]
        if ($i + 1 -lt $filename.split(",").Count) {$row = $row + ","}
        $global:message += $row
    }
}

# =========================================================================

# Get Token for Microsoft Graph authentication

$uri = "https://login.microsoftonline.com/<tenent ID>/oauth2/v2.0/token"

$body = @{
    client_id     = "APP ID"
    scope         = "https://graph.microsoft.com/.default"
    client_secret =  gcloud secrets versions access latest --secret graph-app-secret --project yositest

    grant_type    = "client_credentials"
}

$token = (Invoke-RestMethod -Uri $uri -Method Post -Body $body).access_token

$Headers = @{
    'Content-Type'  = "application\json"
    'Authorization' = "Bearer $token" }

# =========================================================================

# Set mail elements

$mail = Import-Csv /tmp/mail-elements.csv
$msg = Get-Content /tmp/mail-body | Out-String
$template = Get-Content /infrastructure-jobs/msg-template.txt

$global:attachments = @()
$global:message = $template[0..7]
Set-Mail-Addresses -addr $mail.To
$global:message += $template[9..10]
if ($mail.Cc -ne '') {Set-Mail-Addresses -addr $mail.Cc}
$global:message += $template[12..13]

if ($mail.Attachments -notmatch "N/A") {
    $global:fileb = @()
    $global:message += $template[14]
    Set-Mail-Attachments -filename $mail.Attachments
    $global:message += $template[21]
}

$global:message += $template[22..23]


# Convert message string to JSON and send mail.

$msgjson = Invoke-Expression ($message | Out-String) | ConvertTo-Json -dept 100
Invoke-RestMethod -Uri "https://graph.microsoft.com/v1.0/users/reporter@example.org/sendMail" -Method Post -Headers $headers -Body $msgjson -ContentType "application/json"
Brief Script Explanation:
Up to line 26 - two functions appear that are designed to build the JSON template according to the sending data received from the previous script.
Lines 32-45 - perform the issuance of an Access Token from Microsoft Graph. With it, it will be possible to send the email afterwards.
In line 32 - the tenant ID needs to be replaced with the value we recorded aside earlier.
In line 35 - the App ID needs to be replaced with the value we recorded aside earlier.
In lines 51-69 - the JSON is built according to all the data we wrote earlier - email body, attachments, recipients and subject. In line 74, this entire structure converts from flat text into a JSON object.
In line 75 - the email is sent with the Token we created earlier to grant access.
-
It’s worth noting the middle section. This is a good demonstration of how to obtain an Access Token in the OAuth2 protocol. From there we see how to prepare the key in the Header in order to access the API using it.
-
It’s important to note the file paths in the code. This is not accidental, and will become clear later when we see how we store the code and how it’s accessed during the process.
So we now have a script that performs certain monitoring work, and after collecting the monitoring data, it calls another script that sends the data by email to the recipients we entered in the first script.
Now we need to run the script on a certain schedule in an automated fashion.
Secure Source Manager:
When I built this solution, I used this GCP configuration for GIT to store code repositories. This configuration doesn’t integrate very well with other things. At the time of writing the article, the product is not fully baked (as far as I know, usage is still by request). But it works and can serve as an example. Equally, Github or even a storage bucket can be used. Although using Github would allow easier integration with other products like Cloud Build or even Cloud Run.
Because the product is not yet fully open to the general public, I won’t give setup instructions, just a general instruction on how to do a Build from a ready code repository in this product, in Github, or in a storage bucket.
Generally speaking, the scripts and code we want to run in our tasks should be uploaded to that code repository, wherever we store it. Divide the monitoring task code and various configuration settings into folders according to classification and different purposes. Store separately a few files used by everyone. For example:
-
The JSON template file.
-
A file containing the script that sends email - which every task that wants to send an email at the end calls.
So we’ve built our code repository. And according to what’s in the scripts, let’s say we named the Repository “infrastructure-jobs” and placed various folders and files there.
Artifact Registry:
Since we intend to run our processes using Cloud Run, we’ll need to use Artifact Registry to store a Container Image.
- In the GCP management panel, click the three lines at the top left to open the main menu. At the bottom click VIEW ALL PRODUCTS. On the page that opens, go to the CI/CD category and select Artifact Registry. Alternatively, simply search for Artifact Registry in the search bar at the top of the page.
- Anyone using this product for the first time (or at least in the project where they want to store the Container Image) needs to enable the product’s API. Click ENABLE.
- On the page that opens, click + CREATE REPOSITORY at the top.
- Give it the name - monitoring-jobs.
- Choose the Tel Aviv region (me-west1).
- Click ADD CLEANUP POLICY.
- Mark the Delete artifacts option.
- Give it the name - last-3.
- Mark Keep most recent versions and in the field below (labeled Keep count) enter the number 3.
- Click CREATE at the bottom.
Permissions:
Once a repository is created, we’ll need to grant permissions on it.
- On the Repositories page, check the checkbox next to monitoring-jobs.
- You’ll immediately see a PERMISSIONS panel on the right side. Click ADD PRINCIPAL.
- In the new principal field, paste the email of the monitoring-jobs service account we created earlier.
- Click the Select a role field, and in the pop-up search type Artifact. Choose the permission - Artifact Registry Reader.
- Later check which account is used for Build, and give it the Artifact Registry Writer permission in exactly the same way.
Cloud Build:
To run the script in the cloud environment, we’ll need to build a Container Image that knows how to run these scripts.
Here we build a container that can run PowerShell and GCP command-line packages - such as gcloud, gsutil, etc. We’ll copy the script files directly into the container, since it’s a lightweight small repository.
So first of all we need a Dockerfile. It will look like this:
FROM gcr.io/google.com/cloudsdktool/google-cloud-cli:slim

# Install powershell
RUN mv /etc/apt/trusted.gpg /etc/apt/trusted.gpg.d/
RUN apt-get install -y wget
RUN cd /tmp
RUN wget -q https://packages.microsoft.com/config/debian/12/packages-microsoft-prod.deb
RUN dpkg -i packages-microsoft-prod.deb
RUN rm packages-microsoft-prod.deb
RUN apt-get update
RUN apt-get install -y powershell

# Install modules to allow remote powershell
RUN echo $' \n \
[Net.ServicePointManager]::SecurityProtocol = [Net.SecurityProtocolType]::Tls12 \n \
Install-Module PSWSMan -Scope AllUsers -Force \n \
Install-WSMan \n \
Install-Module -Name WindowsCompatibility -force ' >> /tmp/scr.ps1

RUN pwsh -c "/tmp/scr.ps1"
RUN apt install gss-ntlmssp -y

# Get scripts library
RUN mkdir infrastructure-jobs
ADD ./infrastructure-jobs /infrastructure-jobs

# Set local timezone
RUN rm -rf /etc/localtime
RUN ln -s /usr/share/zoneinfo/Asia/Jerusalem /etc/localtime
RUN echo "Asia/Jerusalem" > /etc/timezone

# Clean up
RUN rm /tmp/scr.ps1

SHELL ["powershell", "-Command"]
File Structure:
FROM - The base package of the container starts from a Google-built container designed to run their cloud commands.
Now we’ll add additional items to this package.
Lines 4-11, Installing PowerShell Core - PowerShell Core is a basic PowerShell package designed for installation and running on non-Windows systems.
- The process installs the package as intended for version 12 of Debian. Microsoft originally provided a command sequence that was supposed to flexibly install for the latest existing version, but I saw that it doesn’t work as it should and haven’t found the time to prepare a way for it to work properly. So for now we’ll be locked to a specific version.
Lines 13-21, Installing various modules for PowerShell - this entire block essentially fires a long string that gets captured into a file. The file is saved in PowerShell script format, and the script installs the modules. The modules and package installed in line 21 are designed to enable remote communication of the script with Windows servers - such as Invoke-Command or Enter-PSSession.
- Anyone wanting to add more modules - such as SCCM, Microsoft Graph, MSOL or any other PowerShell module - simply adds lines after line 18. Each new line contains a command to install a new module. As long as it’s not the last line, at the end of the line the sequence “\n \” needs to be placed so that in the resulting script (scr.ps1) a new command line appears.
Lines 24-25, Adding the scripts repository to the container.
Lines 28-30, Setting the container to run according to Israel time.
Line 34, Setting the container to activate PowerShell immediately when it starts up.
Build YAML:
After we have a working Dockerfile, we’ll need a YAML that tells Cloud Build how to build the container.
Such a YAML file is organized and divided into steps, with each step performing a different operation.
The file we’ll work with contains only two steps:
-
A git container whose task is to copy the code repositories from where we store them to the Build environment.
-
A Docker container that will build the container and upload it to Artifact Registry using Docker commands.
The Code:
#build :
#======
steps:
  - name: gcr.io/cloud-builders/git
    script: >
      mkdir infrastructure-jobs

      cd infrastructure-jobs

      git clone
      https://repository-hub/monitoring/infrastructure-jobs.git
      .

      mv Dockerfile.gcloud-pwsh ../Dockerfile
  - name: gcr.io/cloud-builders/docker
    script: >
      ls -l

      docker build -t
      me-west1-docker.pkg.dev/yositest/monitoring-jobs/gcloud-pwsh .

      docker push
      me-west1-docker.pkg.dev/yositest/monitoring-jobs/gcloud-pwsh
Explanation:
There’s a configuration where different operations are performed within a Build YAML.
To simplify things, we’ll simply run the process using bash scripts that will operate at each step.
The Build works within a certain Context. This means there is an environment where files can be saved in one step, and accessed afterwards in subsequent steps.
First Step:
- In line 4, the first step opens, running a git container.
- There we create a folder for the code repositories and enter it. When we move to the next step, the container that starts for the next step will load the work environment and find this folder there, and we’ll be able to work with it.
- Using the git clone command, we copy the contents of the code repository to the folder we created.
- The Dockerfile we saw earlier also sits in the code repository, in the general folder we talked about earlier. So we move it from the general subfolder where it exists to the main folder. This is important, because from where that Dockerfile runs, it needs simple path access to all the folders it wants to copy.
- If storing code repositories inside a storage bucket, use the gcloud container and gsutil command to copy the repositories from the bucket.
Second Step:
- In line 15, the second step opens, running a Docker container.
- There we run the docker build command which builds a Container Image for us based on the Dockerfile we moved to the main folder earlier.
- Then comes the docker push command that uploads to Artifact Registry the image just built.
-
Note that from the start the Image is created with a name tag that includes the general Artifact Registry instance for the Tel Aviv region, followed by the project name where we set up the repository, then the repository name, and finally the name of the Image inside the repository.
-
This format of the name allows the docker push command to upload the Image to exactly where we want it.
Build Process:
- In the GCP management panel, click the three lines at the top left to open the main menu. At the bottom click VIEW ALL PRODUCTS. On the page that opens, go to the CI/CD category and select Cloud Build. Alternatively, simply search for Cloud Build in the search bar at the top.
- Anyone using this product for the first time (or at least in the project where they want to create the Build) needs to enable the product’s API. Click ENABLE.
- In the left menu of Cloud Build, select Triggers.
- On the page that opens, click + CREATE TRIGGER at the top.
- Give it the name - gcloud-pwsh.
- Now choose the event that will activate the Trigger. This varies greatly depending on where the code repositories are stored. If it’s somewhere like Github, you can integrate and link the Repository to GCP using Repositories (located just above Triggers). Then it’s possible to activate the Trigger in response to every Push. If it’s somewhere that can’t be connected through Repositories but is still a GIT-based repository, you can set a Webhook in the repository. This will still activate the Trigger in response to every Push. If the repository sits on a bucket, you can use Pub/Sub which activates the Trigger every time a file is uploaded to the bucket. It would take too long to detail technically how to perform all these methods. I’ll just say that in my case I configured a Webhook.
- When we scroll down to the Build settings, we’ll see that if we chose Webhook, we can only work using Cloud Build YAML or JSON, which we can enter here in the system. Under the Inline option, click OPEN EDITOR.
- On the right, a panel will pop up with a large text box. Clear it and paste the YAML we prepared and saw above.
- Click DONE.
- Near the very bottom there’s a Service account field. Select the custom-build service account we created above.
- Click Save.
Permissions:
- The account running the Build needs permissions. Read permission for the code repositories, and write permission for the repository in Artifact Registry where we want to upload the container.
Now what remains is to push to the code repositories or run the Build another way. At completion, we’ll have a Container Image ready to work in Artifact Registry.
Cloud Run:
And now, after all the preparations, cooking, baking, cleaning and organizing - we can serve the table.
What to Run:
- Click the three lines to open the main menu, then click ALL PRODUCTS. There in the Serverless category, find Cloud Run. Or alternatively, type Run in the search at the top.
- If the service hasn’t been used in that project yet, click Enable API.
- On the service page, click CREATE JOB at the top.
- A service configuration page opens. Choose a Container Image address. Enter the address we created in the Build, together with the latest tag. This means - every time the task is activated, Cloud Run will pull the latest version of that Image. The address in our case is: me-west1-docker.pkg.dev/yositest/monitoring-jobs/gcloud-pwsh
- Choose a name for the task. In our case the name will be gcp-instance-report.
- Location where the task will run - Tel Aviv region.
- Click the arrow that opens the Container, Variables & Secrets, Connections, Security settings, etc.
- In the Container Command field, enter pwsh.
- In the Arguments field, enter the path to the script file (inside the container) we want to run for that task. When we did the Build, we copied the code repositories to the infrastructure-jobs folder inside the container. Let’s say there’s a subfolder named GCP-Monitoring containing the script InstanceReport.ps1. The Argument will need to be: /infrastructure-jobs/GCP-Monitoring/Instance-report.ps1
- Most scripts don’t need many resources to run, so except for exceptional cases we’ll use the minimum that can be allocated to the task.
- Timeout - this varies from task to task. It’s recommended to initially set a high Timeout, observe several times how long the task takes to complete successfully, and set an appropriate Timeout according to the normal run duration + 30%.
- Retries - how many times the task will try to repeat itself in case of failure, until it runs successfully or gives up. This depends on preferences - sometimes we’ll want to set 0, sometimes we’ll set 3.
- Parallelism - can this task activate additional containers in parallel, while another container is still running a task that started earlier? How many copies of this task do we allow to run simultaneously? This also depends on the task and preference. But in our case it will usually be 1 - only one task runs simultaneously, which is the number placed there. Mark Limit the number of concurrent tasks and when the Custom parallelism limit field opens, enter the number 1.
- Click CREATE.
Differences in Tasks Targeting Active Directory:
- Tasks running against Active Directory will certainly need access to internal networks, VPC, and the like. This is configured under the CONNECTIONS tab.
- There, check the Connect to VPC for outbound traffic box.
- If you only need to communicate with Active Directory, it’s simple. Choose Send traffic directly to a VPC and then select the network where the DC servers reside.
- If you need to communicate with additional elements in the network, it’s better to connect to some central network or networking device that will route requests everywhere in the network. An example of this was given in the fourth lab - hub-spoke topology.
Now the task can be run to verify everything is working correctly and the email arrives.
Notes:
Like that example script I gave, it’s possible to run many scripts that monitor, update and configure various environments, create automation, etc.
An example is a multi-project organizational environment, where we want to ensure that in every new project certain APIs are automatically enabled, in every new network a certain DNS is configured, and so on. With scripts you can do almost anything, and therefore once the system exists, it can be used for anything subject to a service account running the task with access to where it’s needed, or a network connection to a specific target in other cases.
Appendix A - OrphanDisks:
Here is a script that scans all projects in the GCP environment and finds disks that don’t belong to any VM.
At the end the script sends an email with the information, so system administrators know if something needs to be deleted or updated.
The Script:
# Loop over all project to list all disks.
$projects = gcloud projects list --format=json | ConvertFrom-Json
$list = @()

foreach ($x in $projects.projectId) {
    $disks = gcloud compute disks list --format "json"  --project=$x | ConvertFrom-Json
    $disks | Add-Member -MemberType NoteProperty -Name 'ProjectID' -Value $x
    $list += $disks
}

# Set disk desired attributes.
$list | %{$_.sourceSnapshot = $_.sourceSnapshot.split("/")[-1]}
$list | %{$_.type = $_.type.split("/")[-1]}
$list | %{$_.users = $_.users.split("/")[-1]}
$list | %{$_.zone = $_.zone.split("/")[-1]}
$list | %{$_.lastAttachTimestamp = $_.lastAttachTimestamp.ToString("dd/MM/yyyy HH:mm")}
$list | %{$_.lastDetachTimestamp = $_.lastDetachTimestamp.ToString("dd/MM/yyyy HH:mm")}

# Get all disks which isn't attached to any VM.
$orphans = $list | ?{$_.users -eq $null} | select ProjectID, Name, SizeGB, Type, lastAttachTimestamp, lastDetachTimestamp

# Set table of orphaned disks.
$style = "<style>BODY{font-family: Arial; font-size: 10pt;}"
$style = $style + "TABLE{border: 1px solid black; border-collapse: collapse;}"
$style = $style + "TH{border: 1px solid black; background: #dddddd; padding: 5px; }"
$style = $style + "TD{border: 1px solid black; padding: 5px; }"
$style = $style + "</style>"

$orphans | ConvertTo-Html -Head $style -PreContent "<h2>Disks not attached to any server</H2>" | Out-File /tmp/mail-body

# ====================================================================

# Configure mail attributes

$mailElements = '' | select To, Cc, Subject, Attachments

$mailElements.To = "CloudTeam@example.com"
$mailElements.Cc = "SystemManager@example.com,SOC@example.com"
$mailElements.Subject = "Disks not attached to any server"
$mailElements.Attachments = "N/A"

$mailElements | Export-Csv -NoTypeInformation -Encoding UTF8 -Path /tmp/mail-elements.csv

if ($orphans.Count -gt 0){
    /infrastructure-jobs/Send-Mail.ps1
}
Appendix B - Active Directory Users with Expiring Passwords:
Pay attention to the following components:
- This script sends an email to users whose password will expire in the next two weeks (or has already expired).
- The email contains an embedded image. The image contains guidelines for choosing a strong password.
- The email also sends an additional image as an attachment.
- The script connects to Active Directory from a container running in Cloud Run. Pay attention to the connection configuration.
- The connection configuration is supported by packages and modules added to the Container Image specifically to connect to Windows servers in a domain environment.
- Due to the special content of the email - including the embedded image - note that the current script edits and recreates the email sending process. The process will be saved in a temporary, separate script. And finally uses it to send the email.
The Script:
# Get fictures for the mail
gsutil cp gs://ad-scripts/PasswordExpiry/* /tmp/

$sendscript = Get-Content  /infrastructure-jobs/Send-Mail.ps1

$cmd1 = '$message = $message.Replace("text/csv", "image/jpeg")'
#$picid = $message[18].Replace("Type", "Id  ") -replace('"image/jpeg"', '"att"')
$cmd2 = '$picid = $message[18].Replace("Type", "Id  ") -replace(' + "'" +'"image/jpeg"' +"', '" + '"att"' + "')"
$cmd3 = '$message = $message[0..9] + $message[13..19] + $picid + $message[20..30]'

$sendscript[0..70] + $cmd1 + $cmd2 + $cmd3 + $sendscript[70] + $sendscript[71..75] | Out-File /tmp/sendscript.ps1


# ====================================================
# Set authentication for AD
$plain = gcloud secrets versions access latest --secret as-pass-expiry --project yostest
$user = "pass-expiry@example.com"
$pass = ConvertTo-SecureString $plain -AsPlainText -Force
$auth = New-Object System.Management.Automation.PSCredential($user, $pass)
$session = New-PSSession -ComputerName DC.example.com -Credential $auth -Authentication Negotiate

$users = Invoke-Command -Session $session -ScriptBlock {
    Get-ADUser -Filter {enabled -eq $true} -Properties PasswordLastSet, mail, MemberOf | ?{$_.PasswordLastSet -ne $null}
}

# ===================================================

$msg1 = "Hello,"
$msg3 = "Please change your password to a strong password."

foreach ($x in $users) {

    if ($x.MemberOf -match "Admins") {$expiry = ($x.PasswordLastSet.AddDays(30) -(Get-Date)).days
    } else {$expiry = ($x.PasswordLastSet.AddDays(90) -(Get-Date)).days}

    if (($expiry -lt 15) -and ($expiry -ge 0)) {
        if ($expiry -eq 0) {
            $EmailSubject = "Your password has expired"
            $msg2 = "Please be informed that your computer password has expired"
        } else {
            $EmailSubject = "Your password will expire in " + $expiry + " days"
            $msg2 = "Please be informed that your computer password will expire in " + $expiry + " days."
        }
        $body = @"
            <html>
                <body style="font-family:calibri">
                    <div dir=RTL><font size="+1"> $msg1 </font></div>
                    <div dir=RTL><font size="+1"> $msg2 </font></div>
                    <div dir=RTL><font size="+1"> $msg3 </font></div>
		            <br><div dir=RTL><img src="cid:att" width="941" height="698"/></div><br><br>
                </body>
            </html>
"@

        $body | Out-File /tmp/mail-body

        # ====================================================================

        # Configure mail attributes

        $mailElements = '' | select To, Cc, Subject, Attachments

        $mailElements.To = $x.mail
        $mailElements.Cc = $x.mail
        $mailElements.Subject = $EmailSubject
        $mailElements.Attachments = (Get-ChildItem /tmp/ | %{$_.name} | ?{$_-match 'jpg'}) -join ","

        $mailElements | Export-Csv -NoTypeInformation -Encoding UTF8 -Path /tmp/mail-elements.csv

        /tmp/sendscript.ps1
    }
}