Working with GCP Workflow
An article demonstrating how to work with GCP Workflow. It details how to create a process that orchestrates different tasks across various compute components and cloud services.
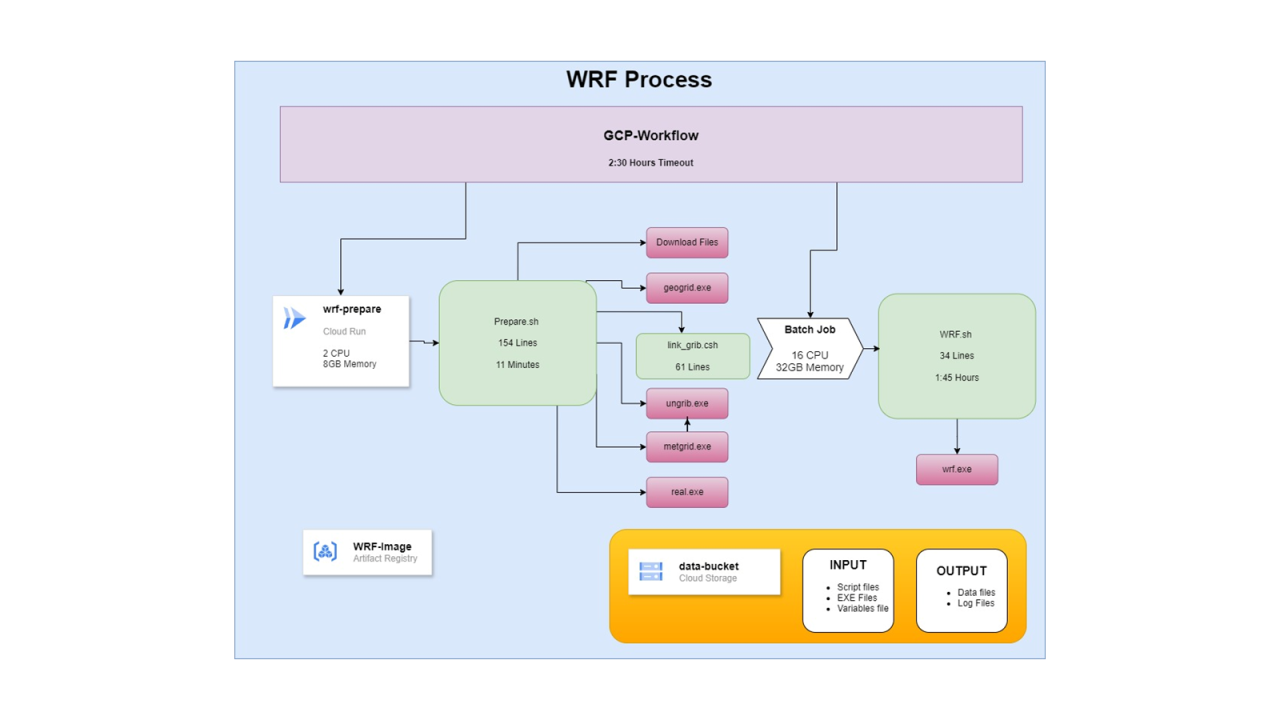
About two weeks ago I shared on LinkedIn how I migrated a WRF pipeline.
A process that had been running in an outdated way was rebuilt from scratch in order to streamline it, simplify editing and oversight, and achieve significant cost savings.
A brief summary of the optimization performed:
The entire script suite, which totalled around 5,000 lines of code, was rebuilt as two bash scripts totalling 230 lines.
The old Container Image, which weighed over 4 GB, was replaced by a new container weighing 240 MB.
Instead of running on a VM that was on 24/7, the process now runs via GCP Workflow. The process takes about two hours. First, a resource-efficient Cloud Run Job runs; in the second part, a Batch Job runs on a larger machine.
When the process finishes, the compute resources disappear until the next run.
WRF process diagram
On the agenda:
In this article I want to demonstrate how to take a multi-step process and manage it using GCP Workflow.
A Workflow is a logical process in which you define steps, each performing a different action.
Steps can include running/launching a component, making an HTTP call, evaluating a condition, loops, and so on.
You define the process using YAML in which you write out the steps.
Before writing the steps in Workflow, you want to verify that each of them works correctly on its own. Then we will see how to call them from within the Workflow.
Artifact Registry:
This component was covered in my previous articles and serves as a cloud library for Images. We will therefore not dwell on it - we will simply reference a fictitious Container Image path as if it were stored there, then use that Container Image for the operations we perform.
Cloud Run Job:
In previous articles I explained in detail how to set up a Service on Cloud Run, including the difference between a Job and a Service.
- A Service waits continuously for incoming requests.
- A Job runs when called, performs what it needs to do, and then terminates.
We will not go over Cloud Run in detail here. Just remember that before calling a job from a Workflow, you need to define it in Cloud Run first. To verify it runs correctly on its own, trigger a few executions - both manually and via a Trigger.
Just to note: Cloud Run runs on containers. We will run our job using the container stored in Artifact Registry.
Cloud Run limits us to a maximum of 8 CPUs per job. Cloud Run is therefore suitable for running the first, resource-light part of our process. The second part achieves best performance with 16 CPUs, so we cannot run it on Cloud Run - it would take too long.
Cloud Batch Job:
This component sits somewhere between Workflow and Cloud Run. It can run a series of tasks and can also run a script or a container - but to do so it spins up a virtual machine. Unlike the two serverless options mentioned above, it is not serverless.
You therefore need to pay attention to the resources you allocate for such an operation. On one hand, the task has its own compute requirements. On the other, you want to avoid allocating an excessive and costly amount of resources. Finding the right balance between these two needs is important.
You can define such a job through the management console, but from there you can only run a one-off job. If you have a workload or process you want to run on a recurring, regular basis, you will need to learn how to run it using JSON.
In our case we use the following JSON:
{
    "taskGroups": [
        {
            "taskSpec": {
                "runnables": [
                    {
                        "container": {
                            "imageUri": "imageUri": "me-west1-docker.pkg.dev/yosi-test-dsfsdf/serverless/wrf:latest",
                            "entrypoint": "/bin/bash",
                            "commands": [
                                "-c",
                                "/tmp/data-bucket/WRF/Process/WRF.sh"
                            ],
                            "volumes": ["/tmp/data-bucket:/data-bucket"]
                        }
                    }
                ],
                "volumes": [
                    {
                        "gcs": {
                            "remotePath": "data-bucket"
                        },
                        "mountPath": "/tmp/data-bucket"
                    }
                ],
                "computeResource": {
                    "cpuMilli": 16000,
                    "memoryMib": 32768
                },
                "maxRetryCount": 0,
                "maxRunDuration": "9000s"
            },
            "taskCount": 1,
            "parallelism": 1
        }
    ],
    "allocationPolicy": {
        "instances": [
            {
                "policy": {
                    "machineType": "e2-custom-16-32768",
                    "bootDisk": {
                        "type": "pd-ssd"
                    }
                }
            }
        ],
        "network": {
            "networkInterfaces": [
                {
                    "network": "projects/yosi-test-dsfsdf/global/networks/test",
                    "subnetwork": "projects/yosi-test-dsfsdf/regions/me-west1/subnetworks/test",
                    "noExternalIpAddress": true
                }
            ]
        }
    },
    "logsPolicy": {
        "destination": "CLOUD_LOGGING"
    }
}
It is worth copying the JSON into a code editor and studying its structure.
JSON structure:
taskGroups - As mentioned, Batch can also run a series of operations, although here we gave it a single task to run. We define a task group for Batch. Each task in the group contains its own properties, configuration, and the resources allocated for it.
taskSpec - Here we defined a single action. Under the runnables section we specified that it should run using a container. In this section you can also define a script to run instead. Since we defined a container, we need to specify the command that will run inside the container when it starts. You can omit this if the container already has a default action defined for startup - assuming that is the action you want it to perform.
volumes - We can attach storage components to the machine running the Batch job. In our case we attached a storage bucket.
Important note!
You will notice that the volumes section appears twice - once in the task definition and once in the container definition inside the task.
Google recently changed how Batch works. As a result, we can no longer place the bucket at an arbitrary path inside the container, because the container is launched on the Batch machine under a regular (non-root) user. You can force execution as root inside the Batch machine, but that is not recommended for security reasons.
The solution:
- Mount the bucket in the
/tmpdirectory of the machine - a temporary directory that a regular user has read permissions on. This makes the bucket available on the filesystem of the ephemeral Batch machine. - Add a line in the container settings that defines a volume for the container. This line is equivalent to the
-vflag in adocker runcommand. It maps a path on the machine running the container to a path inside the container.
computeResource - Next we define the compute resources allocated for that task. In our case this is a custom 16-CPU, 32 GB memory machine. All of these come from the total resources available to the machine running the Batch process. Be careful not to allocate more resources to a task than what is currently or generally available.
maxRetryCount - Defines how many times the process will retry the operation if a failure occurs.
maxRunDuration - Defines the maximum runtime after which the process will shut down the machine even if the work has not completed.
allocationPolicy - Here we define the machine on which the process runs. In our case we defined a custom machine with 16 CPUs and 32 GB of memory. We also specified that the default disk should be an SSD for better read/write performance.
network - Here we specify which network the machine should be placed in. If you omit this section, Batch will place the machine in the default network. If you have removed the default network from the project and no network is defined, an error will occur and no machine will start.
logsPolicy - Here we configured standard log shipping. Be aware that this log shipping produces a large amount of noise, because an agent continuously checks that the Batch process is still running inside the machine and all of those checks are written to the log.
Running the job:
Now that we understand the Batch JSON structure, we can trigger a job like this using a gcloud command. Of course, there are additional fields you can include, and some of what I included can be omitted depending on circumstances.
The command:
gcloud batch jobs submit wrf-batch --config path\WRF-Batch.json --location me-west1 --project yosi-test-dsfsdfAssuming a valid path to a valid Batch JSON and assuming the identity running the command has permission to run Batch, the process will start.
When the process completes, its record remains available for a certain period for monitoring purposes, and is then deleted. There is no option to re-run the same job.
- Notice that the Batch run logs contain a large number of spam lines. GCP Batch runs jobs on a machine, so it deploys the machine with an Agent that knows how to configure and run the tasks inside it. Throughout the entire process GCP Batch verifies the availability and health of the Agent. This is how it monitors the correct execution of the various steps and the application of the next steps.
- In most cases we want to filter out these health-check logs. To do so, add the following filter string:
NOT "Server response for instance" AND NOT "report agent state"GCP Workflow:
Now that we have components working correctly on their own, we want to bring them all together into an ordered process. The process can be triggered using different types of triggers. This allows you to define the process to run on a fixed schedule or in response to various events.
Here is a sample YAML for a Workflow:
main:
    steps:
    - set-date:
        assign:
          - date: ${text.substring(time.format(sys.now()), 0, 16)}
          - shorted: ${text.replace_all(text.replace_all(date, "T", "-"), ":", "-")}
    - wrf-prepare:
        call: googleapis.run.v1.namespaces.jobs.run
        args:
            name: "namespaces/<project-num>/jobs/wrf-prepare"
            location: me-west1
        result: job_execution
    - get-batch-config:
        call: googleapis.storage.v1.objects.get
        args:
            bucket: "data-bucket"
            object: "WRF%2FProcess%2FWRF-Batch.json"
            alt: "media"
        result: object_data
    - wrf-batch:
        call: googleapis.batch.v1.projects.locations.jobs.create
        args:
            parent: "projects/yosi-test-dsfsdf/locations/me-west1"
            body: ${object_data}
            jobId: ${"wrf-" + shorted}
            connector_params:
                timeout: "9000"
        result: createAndRunBatchJobResponse
It is worth copying the YAML into a code editor to examine the structure.
Explanation:
This is an example of a simple four-step process. Each step has a name, followed by its properties.
set-date - This is the first step, where we define variables. The variable created at the end contains a string that encodes (in a specific format) the time at which the string was created.
wrf-prepare - In the second step the process makes an API call to Cloud Run to trigger a job. Here you provide the path to the specific job you want to run. Finally, you add the result field, which causes the Workflow to wait for the operation to complete before moving to the next step.
get-batch-config - In the third step, a call is made to a storage bucket to read from it the JSON that defines the Batch job.
wrf-batch - In the fourth and final step, a call is made to the Cloud Batch API to create a job using the configuration fetched in the previous step.
- This is where the timestamp variable created in the first step comes into play. Since we regularly create Batch jobs, we cannot give them all the same name. Adding a timestamp differentiates each run from the others.
Important notes:
- The
resultline is not mandatory. If you do not define it, once a process is triggered in Cloud Run or Batch you have no control over its execution. In other words, triggering it from the Workflow becomes a “fire and forget” operation. If the trigger action succeeds, that Workflow step is considered complete and the process moves to the next step. If the next step depends on the current process completing successfully, theresultfield is required. - Pay attention to the special syntax used to write the path to a file inside the bucket. The process has difficulty reading forward slashes in the path.
- Also note the
altexpression with the valuemedia. A regular call to an object in a storage bucket returns a JSON containing the object’s metadata - not the object’s content itself. To receive the object’s actual content, you must specify this as shown. As a result, the JSON content is loaded into the variable. - Pay attention to the
connector_paramsattribute. Every time the process calls an API, it does so through a Connector that links to that API. By default, the connection to an API remains alive for only half an hour. Therefore, when triggering a long-running process and wanting to confirm it completed successfully, you need to explicitly define the maximum time the connection should remain open. (Without this, you would simply be launching a container in Cloud Run or Batch without the Workflow confirming that the launch completed successfully.) After that timeout, the step will close even if the task has not finished. If the task has not finished, execution of the step is considered a failure. As a result, the entire process will end in failure - unless you add logic to the process that handles the failure gracefully.