Setting Up Always On Availability Group in a GCP Environment
A guide for setting up Always On Availability Group in a GCP environment. Deploying an MS-SQL cluster in a GCP environment requires adaptations so that the cluster functions correctly in the cloud.
The following guide addresses setting up a Microsoft SQL Cluster in GCP’s cloud environment. In the case of migrating an existing system to the cloud, or setting up a new system, the network configuration in the cloud needs to be taken into account in order to correctly configure the cluster. Setting up Always On Availability Group in a GCP environment requires special handling.
Gaps and Differences:
In an OnPrem environment you can rely on Layer 2 network protocols. These are used for communication between servers and to transfer the primary server role between them. Similarly, assigning addresses to machines on the network can be done from within the machine. The switch holding that network will recognize the new addresses and direct traffic to them.
In a cloud environment there is no Layer 2, and beneath all the systems designed to simplify and simulate a network environment as we are used to it, in reality each machine receives a single IP address on its own isolated network. In the user interface we will see a subnet in the range we defined, with the machine occupying one address from all available addresses in the range. But behind the scenes it works differently, and therefore cluster and LB configurations sometimes need different settings than usual.
We won’t dwell here on the actual installation of MS SQL Server, or on creating an Availability Group. Here we will address adapting an existing system to GCP’s network environment. Properly building an Availability Group in a GCP environment will save problems when transferring the primary server role, or in the general availability of the cluster.
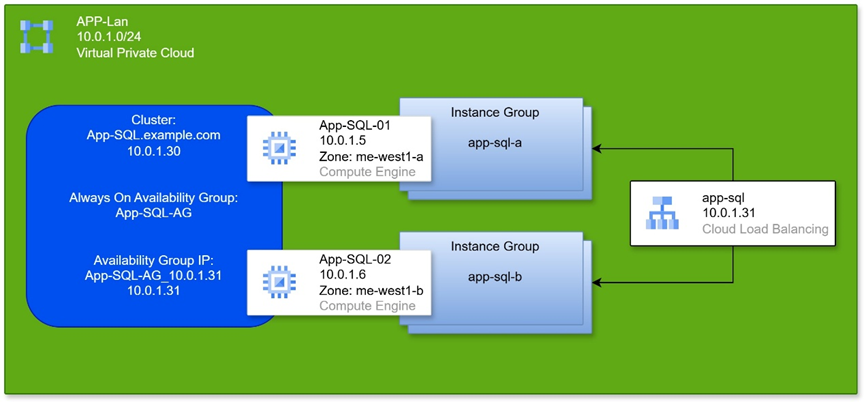
The Setup:
SQL cluster in a GCP environment
Component and Configuration Overview:
On each of the servers in the cluster, you can open Failover Cluster Manager.
When the window opens, we see on the left side the cluster and all components under it. The cluster appears as FQDN - the cluster name along with the domain name, if one exists.
Clicking on the cluster name will display at the bottom of the middle part of the window, the cluster as a network component. Clicking the plus sign next to the cluster name will show us its IP address.
The first component in the list under the cluster name is Roles. Clicking on it will display in the central window the details of the Availability Group. The name of the group, and its IP address.
- Note that the cluster address itself is different from the address of the group that manages the Role.
At the bottom of the middle part of the window (still under Roles), you can switch to the Resources tab. There click the + next to the Server Name and we will see the IP address of the group. Double-clicking on it will give us a properties window for the group’s address. Note the name that exists there for that IP address.
From the command line:
Open PowerShell as administrator, and enter the following command:
Get-ClusterResource The output shows several main components of the cluster. From our perspective two important components are properties of the group. One is a component of type IP Address that represents the address of the Availability Group. This component bears the name of the Availability Group address that we saw earlier in the address properties window of the group. The second is a component of type SQL Server Availability Group, and it bears the name of the group itself, as seen under Roles in Failover Cluster Manager.
Working with HealthCheck:
One of the things that needs to be done is to fix the port through which the group communicates to check the availability of a server, or which of the servers holds the primary role in the cluster.
We will choose port 48999 which is a high port, but not occupied by other services. Conflicts between services can cause problems during role transfers in the group.
We will run the following lines to set the port. Insert the variable values according to the names and address we saw earlier in the Roles properties in Failover Cluster Manager:
$ip_resource_name = << Name of the IP address >>
$load_balancer_ip = << The IP address of the Availability Group >>
[int]$health_check_port = 48999
$avaiability_group = << The name of the Availability Group >>
Get-ClusterResource $ip_resource_name | Set-ClusterParameter -Name 'ProbePort' -Value $health_check_port
Stop-ClusterGroup $avaiability_group
Start-ClusterGroup $avaiability_group
Or taking the example from the diagram:
$ip_resource_name = 'App-SQL-AG_10.0.1.31'
$load_balancer_ip = '10.0.1.31'
[int]$health_check_port = 48999
$avaiability_group = 'App-SQL-AG'
Get-ClusterResource $ip_resource_name | Set-ClusterParameter -Name 'ProbePort' -Value $health_check_port
Stop-ClusterGroup $avaiability_group
Start-ClusterGroup $avaiability_group
Initial Testing:
Open SQL Server Management Studio and connect to one of the servers. After connecting, look at the Object Explorer on the side and see the components under the name of the server to which we connected.
Always On High Availability >> Availability Groups >> < The availability group name >
There in parentheses the role of that server in the group will appear. Whether it is primary or secondary.
Right-clicking on the group name will pop up a menu, and we will click Failover. This will open a wizard for transferring the primary role to another server.
Verify that the failover is from the current primary server to the secondary server. Once the secondary server becomes primary, verify thoroughly that the role indeed transferred, and then you can transfer back.
After verifying that the failovers work properly, you can set up a Load Balancer that points to the group, and through it everyone who needs to access the database will connect.
Setting Up Instance Groups:
Before we can set up an LB, we need to set up Instance Groups that the LB can direct traffic to.
Each Instance Group lives within Zone boundaries. Therefore each such group only sees servers that are in the Zone where it was created.
-
In the three-bar menu, go to Compute Engine and then to Instance groups.
-
Click CREATE INSTANCE GROUP at the top.
-
On the page that opens, click New unmanaged instance group on the left.
-
Give it a name. It is advisable to include the Zone letter in the name.
-
Choose a location. In our case this is the Tel Aviv region, then Zone a and in the next group Zone b.
-
Choose the network in which the group lives.
-
Click CREATE at the bottom.
Repeat the process for each Zone where we have machines in the cluster.
The initial goal is to have at least one machine in Zone a and one in Zone b. From there you can add to Zone c and then more machines spread across the different Zones. But at least two machines, split across two Zones.
Setting Up Healthcheck:
So that the Load Balancer knows to send traffic only to a healthy server that can provide the service, every LB sends Health Checks to the servers behind it. The sending happens on a fixed cycle, and based on the response the LB knows whether it can direct service requests there.
- Still under Compute Engine, go to Health checks.
- Click CREATE HEALTH CHECK.
- Give it a name - for example: sql-48999.
- Choose whether the check is Regional only or Global. A Regional check won’t work with a Global LB. But in our case we will choose Regional.
- Our check is done by sending a simple request (like Telnet) on a specific port. So we will choose port 48999.
- In the check interval field below, you can choose how often the check is sent.
- In the Timeout field you set how long the LB waits to receive a response (in case there is none), before it determines that the request failed.
- In the Healthy/Unhealthy threshold fields, you set how many consecutive responses of a certain type define a status change. For example, how many checks need to fail in a row before the LB determines that this address is unhealthy and should not receive requests. Similarly you define how many checks need to come back healthy to determine that the address has returned to health.
- Click CREATE.
Setting Up Load Balancer:
In the GCP menu (three bars at the top left):
- Network Services >> Load Balancing
- Click + CREATE LOAD BALANCER
- Choose Network Load Balancer, click NEXT.
- Choose Passthrough load balancer, click NEXT.
- Choose Internal, click NEXT.
- Click CONFIGURE.
- Give it a name, choose Region (Tel Aviv of course), choose the network where we will place the LB.
- In the backend settings, add each Instance Group we created as a separate backend.
- Choose the healthcheck for SQL.
- In the Frontend settings, give a name to the Forwarding Rule.
- Choose the Subnet where the address configured for the Availability Group sits.
- Choose address type Ephemeral custom, and enter the Availability Group address there.
- Mark that this address serves all ports.
- Save and create the LB.
Now you can enter the LB page and see that the Instance Group containing the server currently in the primary role is green and the other has a yellow triangle mark.
If so, everything is fine. You can transfer the primary server role to the other server and see that the green indicator also moves with it to the other Instance Group.
And there we have an Availability Group in a GCP environment.