GCP Labs - Lab Five
A lab for making an application accessible through different environments. Taking a Python application and making it accessible as a web page through a storage bucket, an Nginx server, and cloud container environments.
Making an Application Accessible Through Different Environments
Introduction:
This lab is more advanced than the ones that preceded it. To complete this lab, knowledge of Google’s cloud environment is required - you can rely on the previous labs in the series.
This lab’s overview will serve as an introduction to the following labs in the series, which will be more complex.
In this lab you can acquire knowledge and practice the following topics:
-
Making Python code accessible as an application through the browser.
-
Organization Policy conditioned on a tag.
-
A static website running from a storage bucket.
-
Making that same website accessible through an Nginx server.
On the Agenda:
In the upcoming labs we’ll deal with the boundary between infrastructure and application. This is the essence of a cloud architect’s role that touches on DevOps domains.
The cloud environment provides various and diverse tools for making applications and services accessible and operational. To enjoy the advantages offered by the cloud environment, you need to know the variety and be able to use modern tools instead of the old configuration of a server with an operating system for an application, running in a full network environment.
To experiment with these features, we’ll need some application that can work in different environments. The most flexible thing is a Web application that can work from static files.
A static website - an application that does not collect or process information. The application contains a file or several files that know how to communicate with each other, and serve the visitor for reading only, without any change occurring anywhere when the visitor accesses the application.
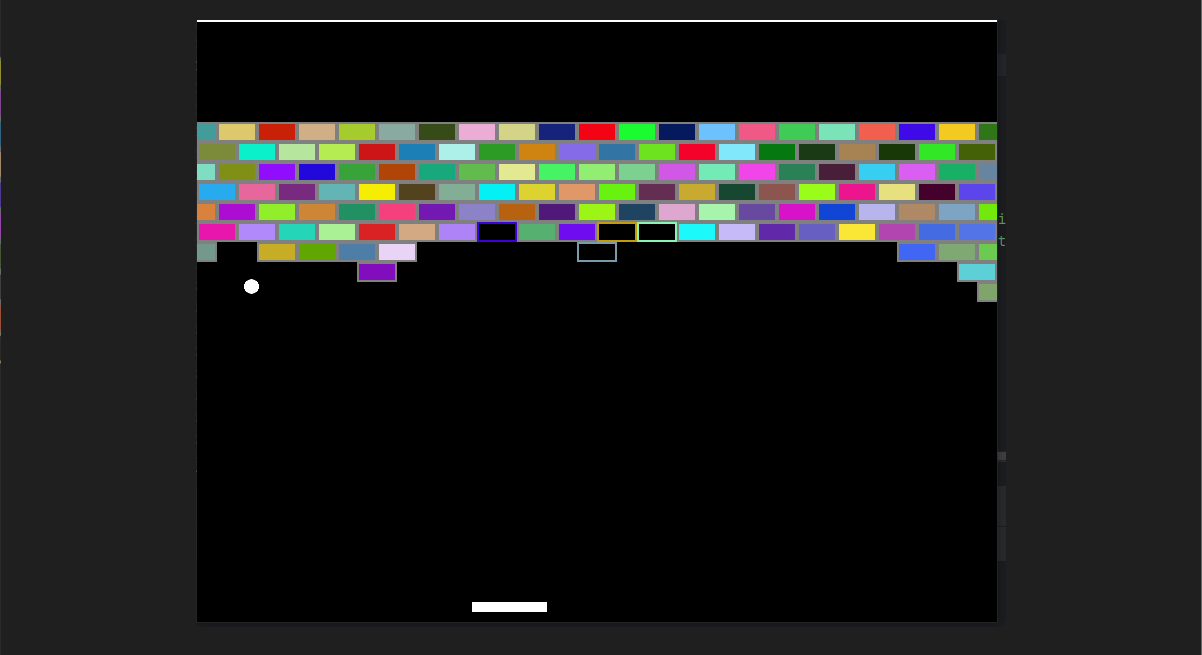
For this purpose I wrote in Python a simple computer game, from my memory of the old “breakout” games that used to run in a DOS environment.
The game is very basic without levels or a menu, and contains some small bugs. But that doesn’t matter and there’s no point in investing beyond that. It works and serves excellently as its purpose as a POC - Proof of Concept.
 BreakBricks game
Running the Python Game:
The following steps deal with Python code and preparing it for a working game. The initial code appears as an appendix at the end. Anyone who wants to skip steps can download the files from GitHub.
-
The BreakBricks.py file contains the game as it works on a computer with Python installed along with the pygame module.
-
The works folder contains the main.py file which is the more advanced version after processing and adaptation for asynchronous operation.
-
Inside works sits the build folder, inside which there are processed files ready for deployment as a web application, as will be detailed below.
Installing Python Components:
-
Installing the free version of PyCharm with an advanced version of Python. Anyone who doesn’t want to deal with Python code doesn’t need to install the software. Python can be installed directly.
After installation, open the software and access Python Packages.
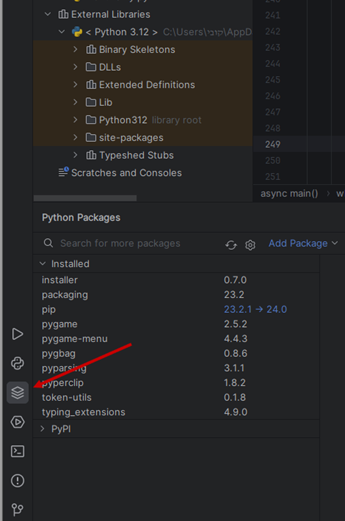 Python Packages
 -
And from there install the following packages: pip, pygame, pygbag
Anyone who doesn’t want to install PyCharm and directly installed Python can open a command line and run the commands:
python -m pip install
pip install pygame
pip install pygbag - Manual installation may require additional work adding environment variables.
-
Create a folder and inside it the BreakBricks.py file. Into the file copy the code from Appendix A at the end of the lab.
-
If using PyCharm you can run the code from there. If not, from the command line:
python path\BreakBricks.py Then a window will open and the game will run inside it.
Embedding a Python Program in a Web Page:
We’ll take the code from Appendix A and modify it slightly:
-
The main program file must be named main.py
-
At the top of the code in main.py you need to add an import of the asyncio module.
-
Add an async main function with the command async def main()
-
Insert into this function the entire loop that runs the program. If there are variables that determine things in the loop, such as the boolean variable that determines the run, or other things, they should be placed into the function.
-
At the end of the function, at the bottom of the loop run - after the line where the clock tick rate is set (program run speed), add the command await asyncio.sleep(0) which tells the program to wait 0 frames before continuing.
-
At the end set a call to the main function with the command asyncio.run(main())
-
Remove the pygame.quit() command. Nothing can come after the line that calls the main function.
-
Open the command line or the terminal in PyCharm, navigate to the folder where main.py is located using the cd path command.
-
Run the file and verify that the game still works correctly after all the edits.
-
Run the command pygbag main.py. Now the pygbag package will collect all the components required to run the program, and build from them a package that runs in a browser environment. Finally port 8000 will open to listen to web calls, which will be associated with the “website” that was just created.
-
Opening a browser tab and browsing to the address: http://localhost:8000
A short loading process will occur after which the game will open in the browser. If loading gets stuck in the middle, you can refresh. Sometimes two refresh operations are needed.
- Anyone who closes the service and wants to reopen local listening for the web service will use the command:
python -m http.server - It’s advisable to run the command in the folder where the generated index file is located. This way browsing to the above address will open the page directly.
Examining Changes:
Now we’ll see that a folder named build was created in the folder where main.py is located. There inside the web folder the execution files are located. We’ll use them later.
In addition, it can be noticed that running the game through the browser is much slower than running it directly through Python. Through the browser the number of frames per second set on line 214 (clock.tick) doesn’t really matter. Therefore it’s worth editing the game.
We’ll go to the update methods of the ball and the paddle at the bottom, so they move 5 pixels each time instead of 1.
Lines 99-100 contain the update method of the bottom paddle. Currently it’s set in the code to move the paddle 5 pixels each time. We’ll change to 10.
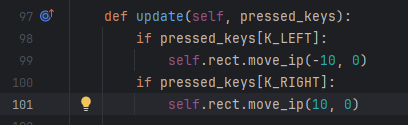 Paddle movement
Lines 132-139 determine the ball’s movement. If it’s currently set to move 1 point each time, we’ll change to 5.
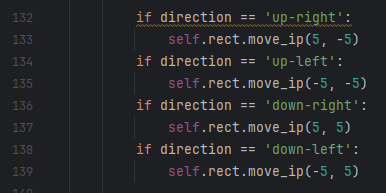 Ball movement
Of course the speed can be changed as desired. You can speed up the paddle’s movement and slow down the ball’s movement by changing the number of pixels the shape moves each time.
Serving the Game from a Storage Bucket:
Since the game constitutes a static application - that is, these are software files that do not change or perform a processing operation, we can turn a storage bucket into a static website and serve the application from it. The application runs on the client side - in the user’s browser.
For this purpose a storage bucket needs to be defined with public access permission - anyone can read the content from the bucket.
Here it’s a lab environment and we’re practicing a single project with a single bucket. But in an enterprise environment, we’d want to mark all buckets with public access for control and enforcement purposes.
For example - in an organization environment it’s possible to enforce an Organization Policy that doesn’t allow public publishing of a bucket. Then to exclude specific buckets from enforcement, we can define a condition in the Policy that will cancel enforcement if the bucket carries a specific tag.
Tags:
Enabling the cloudresourcemanager API:
-
In the console menu choose API & SERVICES.
-
There click ENABLE APIS AND SERVICES at the top.
-
On the page that opens, enter the term cloudresourcemanager in the search bar.
-
Click on the result - Cloud Resource Manager API.
-
On the page that opens, click ENABLE.
Creating a Tag:
-
IAM & Admin >> Tags >> Create
-
In the Tag Key field, put Public-Bucket.
-
Below there’s a Tag values heading and below it an ADD VALUE button - click it.
-
In the Tag value 1 field that appears, put the word Public.
-
Click CREATE TAG KEY at the bottom.
-
Enter the tag, enter its value, on the value page the Tag value path will appear. Copy and save in Notepad. We’ll use this later.
Organization Policy:
This can only be done in an organization environment. Anyone practicing the lab under a personal account during a free trial period won’t have access to this option.
In GCP Console:
-
IAM & Admin >> Organization Policies
-
In the projects menu at the top, open and select the organization itself.
-
We’ll immediately see a list of Policies that can be configured to enforce settings and procedures in a general way - at the project level, folder level, or at the entire organization level. At the top of the list there’s a search bar, write Public there and the option constraints/storage.publicAccessPrevention will pop up. Enter there.
-
Click MANAGE POLICY at the top.
-
At the top of the page a paragraph will appear explaining what this Policy does, and after it the Applies to setting. Mark - Customize.
-
Now enforcement rules and conditions can be created. In the first rule mark Enforced.
-
Click ADD RULE to open a rule with a condition, since you cannot put only a condition by itself. You must put one rule that sets enforcement/non-enforcement, and then rules that set that this option won’t occur according to certain conditions.
-
After clicking ADD RULE a rule card will open. Choose Enforcement - off.
-
Click ADD CONDITION.
-
Give a name, choose a tag-type condition, Has value Operator, and in the value paste the path to the tag value that we put in Notepad earlier.
-
Click SAVE.
-
Click SET POLICY.
Creating a Public Bucket:
Creating a Public Bucket:
Go to Google Cloud Console and there create a Storage Bucket. Right now I’m intentionally marking Enforce public access prevention.
A little about creating a storage bucket can be read in my previous article - Lab Three, Storage and Permissions.
Anyone creating the bucket in an Organization environment can add the following exercise:
-
Verify enforcement of the Policy that prevents defining a public bucket.
-
Enter the bucket in Console and navigate to the CONFIGURATION tab.
-
Click on the pencil in the Tags row.
-
Then in the window that pops up on the side, under Direct tags, click SELECT SCOPE.
-
Anyone who created a tag at the organization level, choose Scope at the organization level.
-
Clicking on the Key 1 field will open a menu, there choose the tag we created - Public-Bucket.
-
Clicking on the Value 1 field will open a menu, there choose the value we created - Public.
-
Click SAVE and confirm.
Important!
You must enable the Cloud Resource Manager API to allow attaching a tag to a bucket!
We can perform the same operation using the following commands:
gcloud services enable cloudresourcemanager.googleapis.com --project mobile-app-yosi

gcloud resource-manager tags bindings create `
--tag-value mobile-app-yosi/Public-Bucket/Public `
--parent //storage.googleapis.com/projects/_/buckets/mobile-bricksbrake `
--location me-west1
Explanation:
The first command enables the Resource Manager API and the second attaches the tag.
You need to enter the tag, then enter the value inside the tag, and take from there the Tag value path. That’s what goes in the Tag Value flag here in the command.
In the parent field you only need to change the bucket name in the last part.
Canceling Public Access Prevention at the Bucket Level:
Now we can cancel the enforcement of Public Access Prevention on the bucket using the following command:
gcloud storage buckets update gs://mobile-bricksbrake --no-public-access-preventionGranting Public Permission on the Bucket:
-
Inside the bucket go to the PERMISSIONS tab.
-
Scroll down a bit, and at the top of the permissions list click GRANT ACCESS.
-
In the window that opens, in the New principal field, write - allUsers.
-
In the Select a role field click, in the window that opens write Storage Object Viewer in search.
-
Choose the result.
-
Click SAVE.
-
In the window that pops up, click ALLOW PUBLIC ACCESS.
Now all that remains is to upload all the content of the build folder to the bucket.
Connecting to the Application:
Now to run the game we’ll need to browse to the index file we uploaded to the bucket. The address will be in the following format:
https://
Or in my case:
https://mobile-bricksbrake.storage.googleapis.com/web/index.html
Uploading the Application to an NginX Server:
In accordance with what we learned in Lab 1, we’ll activate the Compute Engine API and set up an Ubuntu server named brake-bricks, and during the creation process mark Allow HTTP and also HTTPS for it. We’ll enable an external IP address to simplify everything else.
When the machine is up and ready, we’ll connect to it using the built-in SSH button in the GCP console.
Now we’ll turn the machine into a server that serves the application as a Web service:
-
In the SSH window at the top click Upload Files and upload all three application files to the server.
-
Switch to the root user using the command sudo -i.
-
Install the nginx server using the command - apt install nginx -y.
-
Verify browsing to the web server via a browser tab with the address: http://external-ip - where external-ip refers to the external address the machine received upon creation.
-
Navigate to the Web server folder: cd /var/www/html/
-
Copy all files from the bucket to that folder: gsutil cp -r gs://mobile-bricksbrake/* ./
-
Now access the nginx settings - nano /etc/nginx/sites-available/default
Scroll down a bit until we see these lines:
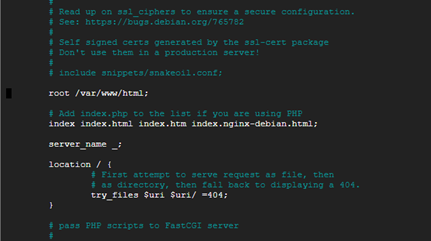 Nginx settings
-
The line starting with root needs to be edited. There the home directory of nginx’s index file is defined. Change to - /var/www/html/web
-
Now refresh the nginx page we browsed to earlier with the external address, and the game loads.
Appendix A:
import pygame, pygame.gfxdraw, random

from pygame.locals import (
    RLEACCEL,
    K_UP,
    K_DOWN,
    K_RIGHT,
    K_LEFT,
    KEYDOWN,
    K_ESCAPE,
    QUIT
)

SCREEN_WIDTH = 800
SCREEN_HEIGHT = 600

# ===============  Create Bricks  ===============

def create_bricks():

    bricks = pygame.sprite.Group()

    for x in range(10):
        if (x % 2) == 1:
            length = 0
        else:
            length = -20
        for y in range(21):
            height = 100 + (x * 20)
            length_position = length + (y * 40)
            br = Bricks()
            br.rect.left = length_position
            br.rect.top = height
            bricks.add(br)

    return  bricks

# ===============  Paint Bricks  ===============

def random_color():
    accepted = False
    while not accepted:
        a = random.randrange(0,255)
        b = random.randrange(0,255)
        c = random.randrange(0,255)

        if ((a > 20) or (b > 20) or (c > 20)):
            color = (a, b, c)
            accepted = True

    return color


# ===============  Change direction  ===============
def change_direction(direction, collision):
    if direction == 'up-right' and collision == 'right':
        direction = 'up-left'
    if direction == 'down-right' and collision == 'right':
        direction = 'down-left'
    if direction == 'up-left' and collision == 'left':
        direction = 'up-right'
    if direction == 'down-left' and collision == 'left':
        direction = 'down-right'
    if direction == 'up-right' and collision == 'top':
        direction = 'down-right'
    if direction == 'up-left' and collision == 'top':
        direction = 'down-left'
    if direction == 'down-right' and collision == 'bottom':
        direction = 'up-right'
    if direction == 'down-left' and collision == 'bottom':
        direction = 'up-left'

    return direction

# ===============  Check bricks collision  ===============

def bricks_collision(ball, brick):
    if ((ball.rect.top + 1) or (ball.rect.top) or (ball.rect.top - 1)) == brick.rect.bottom:
        colision = 'top'
    elif ((ball.rect.bottom + 1) or (ball.rect.bottom) or (ball.rect.bottom - 1)) == brick.rect.top:
        colision = 'bottom'
    elif ((ball.rect.right + 1) or (ball.rect.right) or (ball.rect.right - 1)) == brick.rect.left:
        colision = 'right'
    elif ((ball.rect.left + 1) or (ball.rect.left) or (ball.rect.left - 1)) == brick.rect.right:
        colision = 'left'
    else:
        colision = 'none'

    return colision


# ===============  Player  ===============
class Player(pygame.sprite.Sprite):
    def __init__(self):
        super(Player, self).__init__()
        self.surf = pygame.Surface((75, 10))
        self.surf.fill((255, 255, 255))
        self.rect = self.surf.get_rect(center = ((SCREEN_WIDTH / 2), 585))

    def update(self, pressed_keys):
        if pressed_keys[K_LEFT]:
            self.rect.move_ip(-5, 0)
        if pressed_keys[K_RIGHT]:
            self.rect.move_ip(5, 0)

        if self.rect.right > SCREEN_WIDTH:
            self.rect.right = SCREEN_WIDTH
        if self.rect.left < 0:
            self.rect.left = 0

# ===============  Ball  ===============

class Ball(pygame.sprite.Sprite):
    def __init__(self):
         super(Ball, self).__init__()
         circle = pygame.Surface((32, 32), pygame.SRCALPHA)
         pygame.draw.circle(circle, (255, 255, 255), (16, 16), 8, 16)
         self.surf = circle
         self.rect = self.surf.get_rect(center=(random.randrange(5, 790), 550))

    def update(self, direction):

        if self.rect.right > SCREEN_WIDTH:
            direction = change_direction(direction, 'right')

        if self.rect.left < 0:
            direction = change_direction(direction, 'left')

        if self.rect.top < 0:
            direction = change_direction(direction, 'top')

        if self.rect.top > (SCREEN_HEIGHT + 5):
            self.kill()


        if direction == 'up-right':
            self.rect.move_ip(1, -1)
        if direction == 'up-left':
            self.rect.move_ip(-1, -1)
        if direction == 'down-right':
            self.rect.move_ip(1, 1)
        if direction == 'down-left':
            self.rect.move_ip(-1, 1)

        return direction

# ===============  Bricks  ===============
class Bricks(pygame.sprite.Sprite):
    def __init__(self):
        super(Bricks, self).__init__()
        color = random_color()
        self.surf = pygame.Surface((40, 20))
        self.surf.fill(color)
        self.rect = self.surf.get_rect()
        pygame.draw.rect(self.surf, (128,128,128), (0, 0, 40, 20), 2)

    def update(self):
        if self.surf.get_at((5, 5))[:3] != (0,0,0):
            color = self.surf.get_at((5, 5))[:3]
            self.surf.fill((0, 0, 0))
            pygame.draw.rect(self.surf, color, (0, 0, 40, 20), 2)
        else:
            self.kill()

# ===============  Run the game  ===============

pygame.init()
screen = pygame.display.set_mode([SCREEN_WIDTH, SCREEN_HEIGHT])
pygame.display.set_caption("BreakBricks")
bricks = create_bricks()
all_sprites = pygame.sprite.Group()
ball = Ball()
player = Player()

players = pygame.sprite.Group(player)
all_sprites.add(ball, player)

for x in bricks:
    all_sprites.add(x)

clock = pygame.time.Clock()
running = True
direction = 'up-right'

while running:
    for x in pygame.event.get():
        if x.type == KEYDOWN:

            if x.key == K_ESCAPE:
                running = False


        elif x.type == QUIT:
            running = False

    if pygame.sprite.spritecollideany(ball, players):
        direction = change_direction(direction, 'bottom')

    brick_col = pygame.sprite.spritecollide(ball, bricks, False)
    if brick_col:

        collision = bricks_collision(ball, brick_col[0])
        if collision != 'none':
            brick_col[0].update()
            direction = change_direction(direction, collision)

    pressed_keys = pygame.key.get_pressed()
    player.update(pressed_keys)
    direction = ball.update(direction)
    screen.fill((0,0,0))

    for spr in all_sprites:
        screen.blit(spr.surf, spr.rect)

    pygame.display.flip()
    clock.tick(200)

pygame.quit()