GCP Cloud Labs - Second Lab
In this second lab we learn about backup, recovery and transferring servers between projects in the GCP cloud environment. Backup and recovery procedures are essential for preserving data and applications.

Foundations - Backup, Recovery and Server Migration
Introduction:
This lab was written as a continuation of the first lab, which covered creating projects, networks and first servers in Google’s cloud environment.
In this lab you can practice disk backup and recovery for servers, and initial use of GCP’s CLI through PowerShell. You can also see how to transfer/copy machines between projects or even between Zones in the same project and the same Region.
In all my articles I followed the principle that it’s better to teach fishing rather than give fish. Therefore I always went into deep explanations of various operations - all so the reader would understand in depth how things work. Once a person learns how things work, they know how to apply them generally and across a wide variety of cases, not just repeat like a parrot a specific example shown in a guide.
Based on feedback I received from more advanced users, I decided to take the middle ground. I tried to make the guide/lab slightly more concise, and added the extended and detailed explanations in appendices at the end - for those who want them.
In this lab you can acquire knowledge and practice the following topics:
-
Creating a disk backup profile.
-
Installing Google Cloud CLI.
-
Using basic gcloud commands.
-
Restoring/creating machines from Snapshots.
-
Transferring a machine between projects via Snapshot.
Creating a Backup Profile:
In the GCP management panel, go to Compute Engine >> Snapshots.
Currently everything is empty, since we haven’t done anything yet.
Click CREATE SNAPSHOT SCHEDULE at the top, to create a backup plan for the machine disks.
- Leave the name as schedule-1.
- Verify the location is in the Tel Aviv region.
- Leave it on Regional - since we’re not planning any DR setup here and extra costs aren’t worth it.
- That same Regional should be in Tel Aviv.
- Choose scheduling frequency by hours.
- Repeat every hour - a new Snapshot is created every hour.
- Automatic deletion after one day.
- Deletion rule - mark deletion of Snapshots older than one day.
- Click CREATE.
Explanation:
So we created a plan that generates a Snapshot every hour and doesn’t keep them for more than a day, with those Snapshots saved only locally at the Region level. Don’t worry, they are backed up and built for good resilience within the Region.
The reason we create a Snapshot every hour is because this is a lab environment. So we want to see snapshots being created quickly, and maybe we’ll want to restore disks that changed - and because it’s a lab environment, the volume of changes is compressed in a shorter time.
Now go to Disks (still in Compute Engine) and enter the settings for instance-1’s disk. Click EDIT there. In the editing window, we’ll see there is a Snapshot schedule setting - add the plan we just created and save.
Repeat this operation for all disks.
… Wait!
Isn’t it tedious to perform the same operation over and over on every disk?
So let’s learn to perform the operation using commands through PowerShell - so we can perform series of operations with a single definition.
Installing GCP CLI for PowerShell:
Open a PowerShell window as administrator (on the computer you’re working from) and run the following command inside it:
(New-Object Net.WebClient).DownloadFile("https://dl.google.com/dl/cloudsdk/channels/rapid/GoogleCloudSDKInstaller.exe", "$env:Temp\GoogleCloudSDKInstaller.exe"

& $env:Temp\GoogleCloudSDKInstaller.exe)
An installation window will appear immediately - next…next…next… No need to change anything.
It will take a few minutes until the installation finishes, then in the final window you can uncheck all the checkboxes, then click Finish.
Close the PowerShell window and reopen as admin, then enter inside the command - gcloud init.
The computer will ask to open a browser, and there will ask to connect to a GCP account. Then a request will appear to authorize access to the GCP account via Google Cloud SDK. After approval (you need to scroll down to find the Allow button) - a page will appear informing us that access has been authenticated for gcloud cli.
Return to PowerShell where we’re asked to select a default project. It then continues to run and configure the connection attributes, and finishes.
And now, ladies and gentlemen - PowerShell! (rubbing hands in anticipation).
Open PowerShell-ISE as administrator, and paste the following text into its code editor:
$disks = gcloud compute disks list --format=json | ConvertFrom-Json

$disks | %{gcloud compute disks add-resource-policies $_.Name --resource-policies schedule-1 --zone $_.zone} - A detailed explanation of the commands and how they work - will come in Appendices A and B at the end.
Restoring/Creating a New Machine from a Snapshot:
Option A:
-
In Compute Engine, go to Snapshots and select the one from which you want to restore.
The list can be filtered using the filter at the top, with a search by values appearing in any column in the table.
-
Click on that snapshot to enter its page, and there at the top is a CREATE INSTANCE button.
-
From here a machine creation page opens, where all the regular attributes can be edited and customized - only the disk type and operating system are already selected - a disk created from the Snapshot.
Option B:
-
You can also go to VM instances and from there click CREATE INSTANCE, and there in the Boot disk section click CHANGE.
-
In the panel that pops up, the default is the PUBLIC IMAGES tab - where you can select an operating system from Images offered by GCP. But in our case, switch to the SNAPSHOTS tab and select the appropriate one, and it will serve as the disk and operating system for the machine to be created.
After selecting the rest of the new machine’s attributes, click CREATE and we have a machine created from a snapshot.
Creating a Machine in Project B from a Snapshot in Project A:
Those who examine the options we’ve tried so far will see that in the GCP management panel, when attempting to build a disk/machine from a Snapshot, we receive a list of Snapshots that exist only in the project we’re currently in.
To create a machine in another project, you need to use gcloud commands in one of two ways:
-
A. Create a machine using a gcloud command, with a flag indicating the machine is being created from a snapshot - and that flag points to that snapshot in the other project.
-
B. Create a snapshot using a gcloud command, where the snapshot is created from a disk in Project A, and arrives in Project B.
Once the Snapshot is in Project B, a machine can be created from it in that project - via the management panel or via command line.
Before we try to create a machine, we’ll need a network in Project B:
-
In the projects menu (top left, next to where it says Google Cloud), switch to the second project created in the previous lab.
-
In the second project, go to VPC network >> VPC networks.
-
Click CREATE VPC NETWORK at the top.
-
Fill in the following details:
-
A. Name - vpc-4
-
B. Subnet creation mode - Custom
-
C. Add a subnet named subnet-4, in the Tel Aviv region with address range 10.0.40.0/24.
-
-
Click CREATE.
The Command for Option A:
For this command you need the (almost) complete path for that snapshot. The path can be obtained in two ways:
First Way:
-
Find the Snapshot and enter its page.
-
Click EQUIVALENT REST at the bottom there.
-
In the panel that opens, find the row containing the selfLink value and copy the value.
-
Enter the value in the command under the source-snapshot flag.
Second Way:
-
Find a clear filter for the Snapshot’s name. If created automatically according to the backup plan template we created, it has a unique serial number at the end.
-
If a serial number is found, enter it as a filter (~) in the command requesting a snapshot list. If there’s no serial number, enter the full and exact name of that snapshot as a filter (=).
-
From the command, extract output similar to what we extracted the first way and place in a variable.
-
Enter the variable in the command under the source-snapshot flag.
The Command (along with the filter command for the second way):
$lnk = (gcloud compute snapshots list --format="value(selfLink)" --filter="name~299u9w6x").Substring(38)

gcloud compute instances create from-snapshot `
   --source-snapshot=$lnk `
   --no-address `
   --network="vpc-4" `
   --private-network-ip="10.0.40.40" `
   --subnet="subnet-4" `
   --zone="me-west1-a" `
   --project="yostest-2" `
--machine-type=e2-micro- This method can also be used to copy/transfer a machine from Zone-a to Zone-b.
The Command for Option B:
Here the command is fairly simple. In the first line, enter the name of the disk from which to take a snapshot, so it takes its selfLink. In the command itself, only the target project name needs to be entered.
The Command:
$lnk = (gcloud compute disks list --format="value(selfLink)" --filter="name~instance-1").Substring(38)

gcloud compute snapshots create snaptest `
   --source-disk=$lnk `
   --project="yostest-2" `
   --storage-location=me-west1
Delete the machine created in option A and the snapshot created in option B from the second project.
Creating a Disk from a Snapshot:
Another way to handle the matter is by creating a disk from a Snapshot. The disk can be attached to the new machine when it’s created.
Via the Management Panel:
-
Go to Compute Engine >> Snapshots.
-
Select the desired Snapshot and click to enter its page.
-
Click CREATE DISK at the top.
Via gcloud:
$lnk = (gcloud compute snapshots list --format="value(selfLink)" --filter="name~7frlopcu").Substring(38)

gcloud compute disks create disktest `
   --source-snapshot=$lnk `
   --zone="me-west1-a"
Restoring an Existing Machine from a Snapshot:
-
Compute Engine >> VM instances >> instance-1.
-
Verify the machine is off. If not, click STOP at the top and wait until it shuts down.
-
Click EDIT at the top.
-
In the editing page that opens, scroll down to the Storage area. There is a DETACH BOOT DISK button - click it.
-
A CONFIGURE BOOT DISK button will immediately appear in its place. Click it.
-
A side panel opens - switch to the SNAPSHOTS tab.
-
Select the appropriate Snapshot.
-
Click SELECT to confirm choosing this Snapshot as the source for the boot disk.
-
In the machine editing page, click SAVE.
-
Restart the machine.
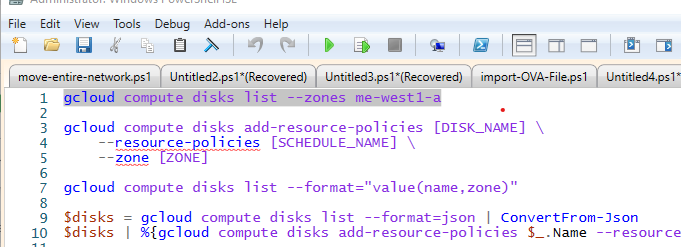
Appendix A - Analysis and Learning of gcloud Command Structure:
First, open PowerShell ISE and copy the following lines into its code editor:
gcloud compute disks list

gcloud compute disks add-resource-policies [DISK_NAME] \
    --resource-policies [SCHEDULE_NAME] \
    --zone [ZONE]

gcloud compute disks list --format="value(name,zone)"

$disks = gcloud compute disks list --format=json | ConvertFrom-Json
$disks | %{gcloud compute disks add-resource-policies $_.Name --resource-policies schedule-1 --zone $_.zone}
GCP CLI commands consist of several main components:
-
The tool being used. In Google’s SDK there are tools like gcloud, gsutil and more.
-
The resource being targeted. This can be compute instances, compute disks, or compute network for VPC.
-
What we want to do with that resource. list - to display a list, create - to create one, etc.
-
Attributes and filters designed to focus the command - called flags.
There are some flags that can be placed in most commands like project or zone, although they’re not always required. Some are typical to specific commands, and the command needs that data to know how and with what to work.
Often when working with GCP’s CLI, we want to extract a list of data about various resources - like a list of virtual machines, disks, networks, profiles, etc.
Let’s return to the commands given above:
Line 1 - here is the basic command designed to display the disk list. By default it shows everything in the project, but adding the “—zone me-west1-a” flag gives only the disks in our default project in Zone-a.
You can mark all of line 1, then click the button that looks like a green play button above a page/document:
 gcloud commands
This button runs only the marked text from the code.
If we run the command without the zone filter, we get this output at the bottom in the terminal:
 gcloud command output
But that’s not enough.
We need the disk list to know which disks we have and which of them we want to apply the backup plan we created earlier to. For that we’ll need to isolate data like the disk name, or which zone it’s in, or what disk type it is.
Let’s look for a moment at the following command, as it comes from GCP’s documentation.
Lines 3-5
This is a command that attaches the backup plan to a disk. The syntax appears as it can be run from a Linux machine.
-
gcloud commands appear in GCP documentation in the syntax appropriate for Linux machines, since every Linux machine that comes ready-made from GCP’s Images (and not for example a machine you migrated as-is to the cloud via OVA file), already has GCP’s SDK installed in it.
-
Also, gcloud commands can always be run from a terminal opened in GCP’s management panel. The button to open the terminal is at the top right (next to the notifications circle) and it opens a terminal to a Debian machine with up to 5GB storage space, where terminal operations can be performed on the cloud environment.
But I prefer to work from PowerShell rather than from the terminal, because I prefer PowerShell’s scripting which is far more powerful than bash scripting - which is Linux’s CLI.
The backslashes visible in the command at the end of the first two lines give the option to move to the next line without breaking the sequence - meaning in the user’s eye who writes the command it looks like they moved to a new line and it appears tidier, but from the machine’s perspective it’s one command.
Line break
In terms of PowerShell syntax, instead of that backslash, the backtick located above the tab key is used (shares a button with semicolon and tilde [~]) - this backtick: `. When the keyboard is in English, this backtick is the default for that key.
- This backtick is different from the backtick that appears in Hebrew with the Q button, or in English with the button containing quotation marks and Hebrew comma. Don’t confuse them - what works with one syntactically won’t work with the other.
In other instances we’ll see how we use that same backtick to display long commands with many attributes (flags) in a visually convenient way. But right now it’s not needed, and you’ll see that later in line 10, I simply condensed the command into one line.
Let’s examine the structure of the command that attaches the backup profile to a disk.
We can see that it consists of the command itself and three pieces of data that need to be entered - disk name, backup profile name, the zone where the disk is located. This means we need to process the data received from the previous command (disks list) and isolate from each disk its name and zone.
Appendix B - Working with Data from a GCP List:
Those who put the output of the command from line 1 into a variable and try to work with it, will find it consists of text lines. That is, the variable receiving the output becomes an array/list, where each member contains one line from the output lines. The first line contains the column headings of this data table.
We’ll immediately see why it’s hard to work with this:
Add the following command to PowerShell ISE’s code editor in line 12, then mark the line and run it:
$list = gcloud compute disks list Now the variable $list will give us the entire table, while $list[0] gives us the header row, and $list[1] gives the data about the first disk in the list, $list[2] the second disk’s data, and so on.
To isolate the disk name, we’ll need to get a bit involved and break down the string making up $list[2]. For example:
($list[2].Split(" ") | ?{$_.Length -gt 0})[0] What just happened? Let’s play.
Since $list[2] is a text line, we’ll have to break it to get to a specific segment, according to the table format we recognize from the initial output.
Using the split method we break the text line into parts, with each space serving as a point where the line breaks again and creates a new part. Since breaking text on spaces can produce many empty parts, filtering is performed afterwards through a pipeline, selecting from all the parts only those with a length greater than 0 - meaning they contain actual text.
This entire command is enclosed in parentheses to turn the command’s output into an object that can be referenced and worked with directly - rather than putting into a variable and then working against the variable.
The command’s output contains a list of values from that same row. The first value (index 0) contains the disk name - as written in the command given above, and the second value (index 1) contains the zone.
All well and good. And in our case, we can refer to the disk list as $list[1..($list.Count)].
Then we can run through this list using a loop or pipeline, and for each member of this list run the command that attaches the backup profile to the specific disk, where we present the disk data using the command we used earlier to break the line and isolate each datum separately.
And it will look like this:
$list[1..($list.Count)] | %{ `    gcloud compute disks add-resource-policies ($_.Split(" ") | ?{$_.Length -gt 0})[0] `
    --resource-policies schedule-1 `
    --zone ($_.Split(" ") | ?{$_.Length -gt 0})[1]
}
A bit complex, and this will only work if the table data behaves exactly as we anticipated. There will be cases where we extract data lists, and for one of the objects in the list, one of the attributes is empty. So on that same row, at that same index, a different attribute will sit.
For example:
In the output table we got earlier, there are six columns. When the second column is the zone, and therefore we reference its value as index 1. If in a certain row the Location value is empty, since we’re breaking a text string and ignoring spaces, at index 1 we’ll get the Location_Scope value instead of the Location value. And that will break our command.
Another way
It’s possible to filter the values by column in advance, and this way we get exactly the value we want.
This can be done using the —format flag - as can be seen in the command in line 7. Using format, the output of a list command can be displayed in certain formats.
If we choose to display the output by values of specific columns, then the command in line 7 shows us only the name of each disk and which zone it’s in. In this state we’d still need to break a text string, so instead of one list, we’ll use two variables - one containing names, and one containing the zone of each disk.
And it will look like this:
$diskname = gcloud compute disks list --format="value(name)"
$diskzone = gcloud compute disks list --format="value(zone)"
Note two things:
-
It’s true that in the table shown to us earlier the column heading for the zone was Location, now we see the actual name of the column is zone. This means that to perform format filtering, the behind-the-scenes names of each column need to be known.
-
Now when we receive a direct value rather than a user-friendly DisplayName, we actually get the complete URL for each zone.
Since this entire URL is unnecessary - and also won’t work as data for the backup profile attachment command - we’ll need to break this apart. Only now we know that all zone URLs look the same. Therefore the command taking each disk’s zone will look like this:
$diskzone = gcloud compute disks list --format="value(zone)" | %{$_.split("/")[-1]}Essentially we added a pipeline to the command that extracts the zone list, which takes every member in the list, breaks it at every backslash found, and gives us the last fragment after all the backslashes from each member.
With that we can work. But there are still problems:
-
If we want to work with a row of attributes, not just two. How many variables and lines would we need to work with to reach all of them?
-
How do we know the actual names of each column?
Line 9 - getting a list of GCP resources as an object with Attributes. When working with PowerShell, it’s most convenient to work against objects with Attributes.
By receiving the list in JSON format, then converting the JSON into an object, we immediately know what attributes the object has, and can thus access the value of each attribute accordingly.
Mark line 9 and run the command. Now we have a list of objects under the $disks variable.
If we select one of the objects in the list and add a dot, this gives us access to its list of Attributes:
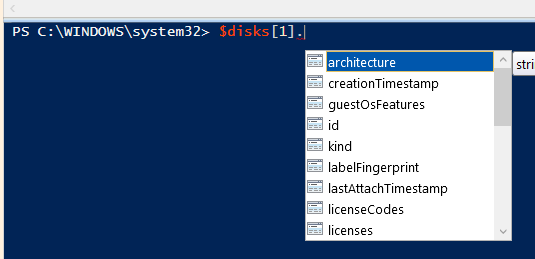 Object attributes
You can now see the actual names of each attribute, and also see that we received far more attributes and information for each disk than was shown earlier in the simple table.
So it appears that in certain cases like ours, it’s more convenient to collect the data into an object via JSON format.
Now run the command from line 10, and in the terminal we’ll see messages running about the disk details being updated. Then wait between two hours to a day - so a quantity of snapshots will be created - and then continue.
Filtering Items in the Received List:
After the required time has passed and Snapshots have been created for every machine, we can receive a list of all of them using the following command:
gcloud compute snapshots list We received the table, which this time contains the following columns: NAME, DISK_SIZE_GB, SRC_DISK, STATUS.
And if we want to filter only the snapshots of instance-1, we’ll use the following flag - —filter.
For example, this way:
cloud compute snapshots list --filter="name~instance-1" We can see that since the snapshot name contains the machine name and its zone (together with a timestamp and serial number), we received a list of all items where there is a match to the expression instance-1.
It can be understood that the tilde (~) symbol denotes a match in GCP’s filter.
The other symbols are fairly conventional, with = for exact match, exclamation mark for negation - such as =! for “not equal to”, right and left arrows for values greater or less than, etc.
So let’s try to filter for those where there is a match to the Source-Disk containing instance-1:
gcloud compute snapshots list --filter="src_disk~instance-1" Doesn’t work. Why?
Because the column name in the table doesn’t match the attribute name behind the scenes. Return to JSON to check the column name:
$snap = gcloud compute snapshots list --format=json | ConvertFrom-Json

$snap[1]
In the first command we place the entire list into a variable, with each item in the list entering as an object with attributes, received from JSON format. In the second command we display in the terminal item index 1 in the list (the second item), and in the terminal we’ll see all the item’s attributes.
We can see therefore that behind the scenes, the attribute name is sourcedisk.
And if we filter by that, this time it will work:
gcloud compute snapshots list --filter="sourceDisk~instance-1" Multiple filters can be added, connecting them with the AND expression:
gcloud compute snapshots list --filter="sourceDisk~instance-1 AND name~20230706193901" We can see that despite having 18 snapshots for instance-1 in my list currently, since I specified another filter containing the timestamp of one of them - and this timestamp belongs only to snapshot-1, the filtered result includes only that specific snapshot.
- Format and filter are case sensitive!
In fact, logical expressions can be entered within the filter, just need to ensure the connector words appear in capital letters, with spaces between expressions and connector words. Logical expressions include AND, OR, and also NOT.
Of course, we can always put everything into an object via JSON and then filter as objects are filtered using a pipeline. There are several ways and each will be more convenient in different cases.