UI for Searching Changes Made to Active Directory Accounts
A user interface for documenting and monitoring changes to Active Directory users. The tool is written in PowerShell, is simple and easy to use, and consumes almost no resources.

This is the second part of a tool for detecting changes made to accounts in Active Directory.
Summary:
In the first part we built an automated mechanism that collects logs of changes to user accounts, processes them, extracts relevant information, and inserts the processed data into monthly CSV tables.
Before moving on to the current part, I decided to write a basic guide for creating a user interface in PowerShell - both to give the reader a foundation for understanding how a user interface works, and to give anyone who wants the tools to start building their own interfaces.
And finally we’ve reached this part, which explains how to build a user interface that makes it easy to find specific events and changes in user accounts - changes that were saved in the CSV files created by the process from the first part.
A Little About Using the Tool:
The tool is simple and convenient to use, and is intended primarily for IT department personnel who want to track changes to user accounts - such as HelpDesk, System, and Information Security staff.
At the end of the article, three appendices will appear. The first contains the code that runs the tool. The second contains the content that should pop up when clicking the Help button, and the third contains instructions on how to turn the PowerShell script into a program that opens via an icon on the desktop (or any location of the user’s choice).
A bit long…
The article explains the code’s operation and the reasons for using certain approaches in great detail - all to teach anyone who wants to know different ways to write PowerShell scripts.
Therefore the article can be long, in-depth, and even tedious for those who are not interested in explanations about how the code works and is written.
Anyone who just wants to use the tool can read the section on using the interface, or even skip straight to the appendices and take from there the code that runs the tool, the content for the help file, and the instructions on how to run the tool using a desktop icon.
Using the Interface:
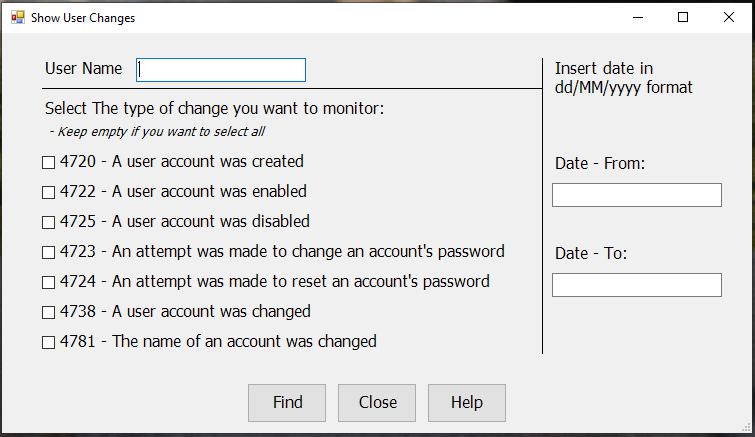 Search interface for user account changes
As can be seen in the image, the interface is divided into four groups, three of which are separated by two lines. The design is simple, minimal, and functional.
Layout:
At the top there is a text box where you can enter the name of the account on which changes were made. If no username is entered, the search will find all accounts that match the other defined characteristics.
Below the line there is a group of change types that can be made to accounts. If you know what change was made and want to narrow the search, you can check the desired type. If no type is checked, the search will find all types.
On the right is the date area.
Unlike the two previous groups, the date area is mandatory and must be filled in exactly the format specified.
The process will not run without correct completion of the date fields.
Buttons:
Finally we reach the last group - the button group. There you can click Find to find events in the defined time range, close the window, or pop up a window explaining how the interface works and helping the user know how to enter the search data and how to read the results.
Assuming the date fields were entered correctly, clicking Find will bring up a results window similar to the one seen in the image.
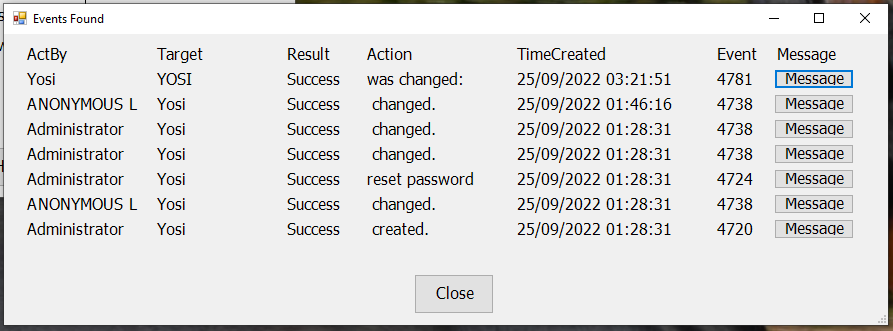 Search results
Structure of the Results Window:
As can be seen, for each event there is a row in the window. The row contains the following fields in order from left to right:
-
ActBy - who made the changes to the account.
-
Target - which account was changed.
-
Result - whether the action was performed successfully or it was a failed attempt.
-
Action - a description in a word or two of the action performed on the account.
-
TimeCreated - a timestamp from the moment of the change.
-
Event - what is called an EventID. The number representing the type of event that occurred from the system’s perspective.
-
Message - sometimes we won’t want to be satisfied with the data shown in the table, and we’ll want to read the entire log of the event. This can happen mainly with messages about an account that was changed. In such a case we’ll want to know which field in the account changed, and that detail appears only in the full message.
More About Message:
Message appears as a button. Clicking it pops up an additional window that shows the full event message.
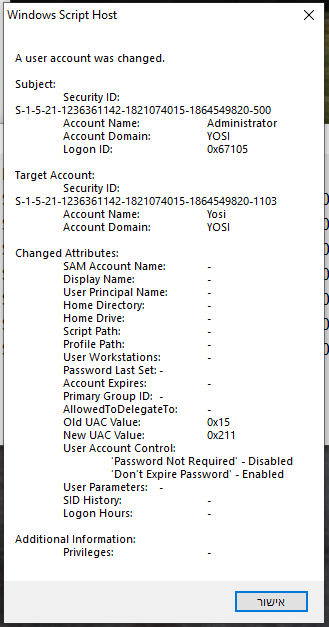 The full documentation of the change
Window Size and Scrolling:
The height of the results window can change depending on the number of rows - up to 20 rows. From 20 rows and above, the window will remain at a height containing approximately 20 rows, and you can scroll down and up to reach additional rows.
The Close button appears at the bottom of the results window. If the number of rows is high, you need to scroll down to find the close button.
After the operation of the tool and its various parts has been explained, we can move on to the code behind it and explain the construction pattern and the code logic.
The Code:
- As usual, the code description and line numbers relate to how it appears in the PowerShell code editor - PowerShell ISE.
The code as a whole looks somewhat long for a script, containing about 400 lines. But there’s no need to be alarmed by the length. Much of the volume includes documentation lines, and a very significant portion includes definitions of window properties and the user interface. That is simply a straightforward repetition of the same properties with minor changes.
Of all that length, there are roughly 70-100 lines of running logic, some of which are documentation, and an additional block that closes the appearance properties of the results window.
In short, there is no need to be alarmed and it’s worth diving in to learn what it’s about.
The code is divided into different sections that perform different operations.
Initial Imports and Definitions (lines 1-9):
At the beginning of the code, libraries required for building the user interface are imported. Then a variable is defined containing an object that can pop up message boxes on demand. This object will come into use several times throughout the code, in order to pop up various messages to the user.
Finally, the path is defined in which the process searches for files. These are the data files containing documentation of changes to the various accounts, as well as a text file containing user information and help on how to use the interface. The file opens when clicking the Help button.
At the end of the article an appendix will appear containing the content of that file. You just need to copy it to a text file named Help.txt and place it in the path where the CSV files containing the information are saved.
That same path goes into a variable on line 9.
Creating the Results Window (lines 14-21):
In this section a function is defined. The function creates a simple window. Later, properties and data will be added to the window according to circumstances.
Note that the window is defined to open in the center of the screen, and to allow scrolling if the content exceeds the defined window boundaries.
Also note that the height defined for the window is very small. This is important for the later process.
Adding Rows and Properties to the Results Window (lines 26-111):
Here another function is defined. This function is activated and runs every time a row needs to be added to the results window. Each row contains data on one event, and they are all arranged in a table format.
Parameters (lines 30-39)
The function works with a set of parameters whose values it receives from the main process that calls it, but most parameters have default values defined. This is because the first row needs to be the header row of the table, and it displays fixed data. In all other rows that will be added, the data will change according to the event they describe.
Line 40
Here a short function is defined, or actually a ScriptBlock - which is a piece of code enclosed in curly braces.
Here the block is especially short, and all it does is pop up a message window (from the object defined at the beginning of the code, line 7) containing the value of the $Whole variable. This variable is a parameter to the row-adding function, and contains the full message of the current log.
In summary - this ScriptBlock pops up a message window containing the current log in its entirety. And all this action is placed into the variable $do.
As explained in the guide to creating a GUI, you can insert a code block into a variable, and then define a button click that calls the variable and runs that code.
We’ll get to the button click later.
Line 47
Here the horizontal position where items begin to appear in the results window is defined - 20 points from the left.
Line 48
Here the vertical position where each row begins - how many points from the top of the window we count to reach the beginning of the row.
The logic behind how this line is written defines 10 points of margin from the top of the window for the first row, and then 5 points of margin between rows. Because the starting points of each row come in multiples of 25 points, but the height of each row is 20 points. Which leaves 5 points of margin until the point where the next row begins.
Lines 51-91
Here 6 of the 7 data items appearing in each row are defined.
As can be noticed, the definition pattern is fairly repetitive, and there are small changes in the data relating to the width the column needs to occupy.
It’s important to note that instead of absolute positions for a cell, a relative position is set for each item. The height at which each row starts is not a fixed number of points from the frame, but a number that changes according to the row number. Similarly the horizontal position in the window is not given in absolute numbers (although that would have been possible in this case).
The first cell starts according to the variable $l, which is not actually a variable. Its value is always 20, and in effect points to 20 points from the left boundary of the window.
But each subsequent cell starts with a calculation based on the position relative to the cell before it.
And it is written like this:
The starting position will be - take the starting point of the previous cell, add the width of the previous cell, add another 10 points to give spacing between columns - and there is the starting point of the cell.
This is how the value of each column is set relative to the one before it.
It would have been possible to calculate the width of each column in advance and set the positions as fixed numbers, rather than having the code calculate it each time it runs.
But this was written to show that possibility, which is sometimes necessary. For example - in the height position calculations for rows in the results window.
Message Button and the GetNewClosure() Method:
After the first six columns were defined, in lines 94-107 the seventh and last item is defined - Message.
While all other items always consist of text - and therefore in the header row they receive a default value, and in all other rows their text comes from a variable, the last item is a button.
Creating this column is more challenging than the other columns.
First, a condition needed to be placed (lines 94-101) that distinguishes between the header row and other rows. Because in the header row there’s text for the header, and in all rows containing data there’s a button.
After the button was defined, the action the button will perform was defined - the action that went into the variable $do that was defined and explained above.
And here I want to pause and explain the uniqueness that this operation required.
Preserving a Variable That Keeps Changing:
Each of the values in the various columns in each row is set at the same moment the items in the row are defined. The value in the last column is also set at that same moment - set as a button containing the label Message. But the action that the button performs is the problem. Because the button calls a variable. And the problem with a variable is… that it changes.
Because all the rows are created using a function, the values that create each row are different each time. And if the code sets the Message button to call the variable $whole, that’s what will happen when it’s clicked.
But when the button is clicked, the function has finished running. And the variable that existed in the function’s environment is not available. Problem.
And if we set the variable to be global, it still changes every time the function runs. Since the button was defined, the function has had time to run a few more times, and now there’s a different value for the variable $whole - the value from the last time the function ran.
So if we have 5 rows and at the end of each row a Message button, what will happen is all the buttons will open the same message. Because they all call the same variable.
The Solution:
Here the GetNewClosure() method comes into use, applied to that ScriptBlock that went into the variable $do.
When you write a ScriptBlock and inside it variables, every time the ScriptBlock runs, it will look for the current value of those variables. If you want to lock the outgoing value of those variables, or the result of that ScriptBlock, you use the GetNewClosure method.
This method essentially exports the result of that ScriptBlock and disconnects it from any connection to the variables and block that produced it. This result carries an independent value that can be placed into a variable, and will be preserved stably going forward, even if the environment that created it has changed its value and context several times.
Otherwise:
If the ScriptBlock above had been placed into the variable $do, the variable would run the ScriptBlock, which would call the variable $whole and pop up its value in a message window.
But now, the ScriptBlock was not placed into the variable. With the method’s activation, the ScriptBlock ran then, and all its context was closed and sealed. Its result - a message window carrying the log of that event from that run of the function, was saved in the variable $do, and set as the result of the Message button in that row. And if in the meantime the values of all those variables have changed, it no longer matters. The value from back then is already set in the variable $do and tied to that button.
Lines 103-107
Here the rest of the Message item’s definition is made. These definition settings don’t change from row to row, and therefore are not subject to the condition placed above.
Line 110
Here an assignment is performed that links all the defined items to the object representing the results window.
Creating the Main Form Window (lines 116-308):
Lines 116-119
The creation of the window itself is set here. The properties are very simple and there is no need to expand on them.
Lines 124-137
The section where the user account is entered is defined. Here two objects are defined - a text box for input, and a label next to it explaining what to enter in the text box.
Here too the definitions are simple and the positions were set in absolute terms.
Lines 142-212
9 items are defined - 2 labels explaining how to enter the output, and seven checkbox items, each representing a specific type of event to include in the search.
Again most definitions are simple, and it can be noted that once again each item’s position is set relative to the item preceding it.
Lines 217-253
The date area is defined. Again the definitions are simple and the position is relative to other items in the window.
Lines 256-257
All the items that were created and defined are added and linked to the object representing the main form window.
Lines 262-267
Two lines are added to the main window. The lines separate three different areas and give order to the structure of the items in the window.
Lines 272-305
The buttons at the bottom of the page are defined. The actions of the Close and Help buttons are also defined there.
Line 308
The button items are added and linked to the main form window.
The Search and Results Display Process (lines 313-400):
The main process occurs when the Find button is clicked. That is, after all, the purpose of the tool - to find events according to the defined filters.
To find the events, user input must first be received. And before starting to work with it, the input must be validated to ensure there’s something to work with - to avoid falling into errors.
Since the date range was defined as the most important filter, this filter is checked in several ways.
The Date Range Is the Most Important for Two Reasons:
-
A date that is not defined correctly will be very hard to search and match results without errors.
-
It is impossible to cancel date filtering, as was defined in the account or event type filtering.
If no date filter is defined, the process will have to search for events in all existing files. This could greatly expand the search range and the number of results.
Control:
The first check for the date fields is performed in lines 317-321. There a check is made whether two dates were entered in the requested format.
The check takes each of the date fields, collects the content of the field, and attempts to convert it to the date format the tool works with.
Dating:
Anyone following the code of this tool across both parts, will notice that a uniform format for working with dates was defined.
The format appears in different lengths. Starting from a full length that includes a timestamp of date and time - including seconds, and ending with a short length that includes only the month and year.
Using this format helps convert timestamps and dates from a text string to a date object - and vice versa.
When a date object exists, it can be easily turned into a string using the ToString() method, to which the format is sent as the format in which the date will be displayed and converted to text.
When we have that text, we can use the ParseExact() method to turn text into a date object.
Here errors must be avoided. Therefore there will be no direct conversion of text to a date, because perhaps the content of the text box doesn’t match the format and the process will crash or malfunction.
Therefore the entire process depends on a condition.
The condition checks using the TryParseExact() method whether each of the date input fields contains text that can be properly converted to the requested format. If the attempt fails, there’s no error. We simply move to the other option presented by the condition.
It can be seen that the call to the TryParseExact() method takes a line and a half each time. The writing is long because the method call requires entering four pieces of data whose writing is lengthy.
It can also be seen that the condition contains the and operator. This means that to continue, the validity of both date fields must be verified. As soon as one field is entered incorrectly, the condition will decide that the check failed and we move to the other option.
If the check passed successfully and the date format was found to be valid, input is collected to define the search filters (lines 324-337).
Lines 324-325
All checkbox items are collected, and then filtered to see which box is checked. Into an array-type variable, the names of the events checked in the boxes are entered.
Lines 327-328
The input from the date fields is collected, and converted to a date-type object.
Lines 331-332
The input from the username text box is collected into a string. If the box is empty, an empty string is created.
Line 335
A check is performed on the data collected in lines 324-325. If it is found that no checkbox was checked, that means there is no filter and it’s as if all boxes were checked. Which means the search must find all event types.
Line 337
The objects taken and converted from the date fields are compared to verify that the first date indeed precedes the last date. If the last date precedes the first, a message pops up for the user. Then the process doesn’t have much to do and will end within a second. Then the user can correct the dates they entered.
Search and Filter:
At this stage all the data for the search is already available, and we can begin.
First, the search range is defined according to date. Since the date range determines how many files need to be searched (each file contains a month of events).
Line 340
An empty array is defined for files to search.
Since the files in the folder carry date tags of monthly dates, the manner in which files will be selected must be correctly defined.
Line 341
The first of the two dates determining the time frame for the search is taken, and from a date it becomes a string containing only the month and year.
That string is re-converted (in the same line) to a date object, in the format containing only the month and year.
In this way, any date of a particular month becomes the time point of the first second in that month. This date enters into a variable.
Lines 342-345
A loop runs. The loop runs as long as this date of the first second in that month is not later than the date defined as the last boundary of the time frame.
If the above date does not exceed the time frame, the date format corresponding to the filename of that month is added to the array from line 340, so that it can later find the file in question.
Then a month is added to that date, which becomes the first second in the following month - and the check is performed again.
Explanation:
In this way, if the range is between 10-17 and 11-13, first month 10 is checked. Is the first second of month 10 later than 11-13? No. So add the file for month 10 to the list, and then add a month to the date.
Now the loop runs another iteration. So it’s checked whether the first second of month 11 is later than 11-13. Still not. Add the file for month 11 to the list too, and add a month to the date.
Another iteration. Is the first second of month 12 later than 11-13? Yes. The loop stops running.
What do we have? The files for months 10 and 11, both of which contain events within the defined time frame.
And with the filenames found by the previous loop, we advance to the next stage.
Line 348
An empty array is defined that will absorb all the matching events collected from all the files.
Lines 349-356
A loop is defined that runs over each of the filenames collected earlier, and filters out the matching events from the file.
How?
The array of filenames collected earlier is taken, and a loop runs over all of them. First a check is made in the folder defined on line 9, whether a file matching the name the loop is currently running with exists there.
If so, all the matching events from that file are collected into a variable.
-
First all events are imported from the file.
-
Then the events are filtered, where the account name matches the input collected from the username text box. An empty string will match all names.
-
From all events matching the requested username, those whose event code is in the list of codes checked at the input stage are filtered. If none were checked, they were already set (line 335) to include all of them.
-
From all the events we still have, all events whose timestamp is later than the first boundary and also earlier than the last boundary of the time frame must be collected. That is - events within the defined time frame.
Getting Results:
All the events collected into that variable are added to the general events array, the one defined on line 348.
Note that the entire filtering command was written on one long line. It might have been better in terms of good writing to split the filtering into three separate commands - for the sake of code readability. But I wanted to show something here. In PowerShell, if you want to continue the code to the next line, you use a small backtick from the key to the left of the key for the number 1, and above the Tab key. Place the backtick at the end of the line, and then you can go down a line and continue the code as if it was still being written on the same line.
After the loop finished running over all the filenames and collecting from all of them all the events matching the filter characteristics, there exists a list of events that can be displayed to the user.
Creating the Results Window (lines 359-393):
Line 359
A call is made to the PopResult function, which was defined right at the beginning of the code. This function creates the basic window for the search results.
Line 360
A call is made to the AddLine function defined above, passing it the counter 0.
As recalled, the AddLine function adds rows to the search results window. The position of the row in terms of height is determined by the row’s counter number. That’s why this is the only value sent to the function.
All other parameters receive default values and create the header row.
Lines 363-369
The counter value is set to 1, and a loop runs over each of the events in the collected events list.
About the Loop:
In each iteration of the loop, a call is made to the function, and the call sends to the function the fields from the log, so it can arrange them in the row set in the results window.
Also, the counter’s value is sent to the function, to know at what height to place the new row.
Then the counter increases by one, and the loop continues to the next iteration.
After the loop finishes all its iterations and rows have been set in the results window for all the events that passed filtering, the height of the results window is set according to the number of rows it contains.
Lines 374-375
A condition is set that says if there are fewer than 20 rows, the window height will shrink to contain the existing rows. Otherwise, the window height will receive a set value, and to reach other rows you can scroll down and up (on line 20 an automatic scrollbar was defined for the results window, which will come into action when needed).
Lines 378-392
The Close button for the results window is then defined.
Line 393
After the results window is fully defined, the command runs that shows it to the user.
Conditional Block:
All the code that ran up to now was within the condition defined on lines 317-321, which set that all of this would work only if both date fields were entered with dates in the appropriate format.
Lines 395-399
What will happen if the condition is not met is defined - that is, at least one of the date fields did not receive input in the appropriate format.
Line 398
In fact, only one thing happens - line 398 pops up a message window for the user, telling them to enter the date in the correct format.
Here the action that runs when clicking the Find button ends. And after the definition of that button concluded, the command appears that displays the main window.
Appendices:
Appendix A - The Code:
Here is the complete code that builds the tool.
# Add libraries required to run the GUI

Add-Type -AssemblyName System.Windows.Forms

[System.Reflection.Assembly]::LoadWithPartialName("System.Drawing")

[System.Windows.Forms.Application]::EnableVisualStyles()


# Creates popup object which can pop text in a message box.

$pop = New-Object -ComObject Wscript.Shell

# The path to the location of the CSV files which contains the events.

$path = "\\SharedFolder\SubFolder\"


################################ Result Form ################################


# That function creates the base window of result.

function PopResult {

   $global:Result = new-object Windows.Forms.Form

   $Result.Text = "Events Found"

   $Result.Width = 900

   $Result.Height = 50

   $Result.StartPosition = "CenterScreen"

   $Result.AutoScroll = $true

}


################################ Function Result ################################


# This function takes each event from the search result, and prepares for it a line in the result window.

function AddLine {


   # Parameters received from the main proccess, with the detail of the event.

   # Parameters has default value for the 1st time running without input - for header line.

   param (

       $whole,

       $actby = "ActBy",

       $target = "Target",

       $res = "Result",

       $action = "Action",

       $time = "TimeCreated",

       $id = "EventID",

       $count

   )


   # Insert an action into a variable.

   # The action is to pop a message window contains the whole event message.

   $do = {$pop.Popup($whole)}.GetNewClosure()


   # Define the coordinates where the result window start present the line.

   # The 1st line takes 10 pixels of space from the frame, and all lines takes 5 pixels from the line above.

   $l = 20

   $h = 10 + ($count * 25)


   # The objects in that line.

   $tag_ActBy                       = New-Object system.Windows.Forms.Label

   $tag_ActBy.text                  = $ActBy

   $tag_ActBy.width                 = 120

   $tag_ActBy.height                = 20

   $tag_ActBy.location              = New-Object System.Drawing.Point($l, $h)

   $tag_ActBy.Font                  = New-Object System.Drawing.Font('tahoma',12)


   $tag_Target                      = New-Object system.Windows.Forms.Label

   $tag_Target.text                 = $target

   $tag_Target.width                = 120

   $tag_Target.height               = 20

   $tag_Target.location             = New-Object System.Drawing.Point(($tag_ActBy.Location.X + $tag_ActBy.Width + 10), $h)

   $tag_Target.Font                 = New-Object System.Drawing.Font('tahoma',12)


   $tag_Result                      = New-Object system.Windows.Forms.Label

   $tag_Result.text                 = $res

   $tag_Result.width                = 70

   $tag_Result.height               = 20

   $tag_Result.location             = New-Object System.Drawing.Point(($tag_Target.Location.X + $tag_Target.Width + 10), $h)

   $tag_Result.Font                 = New-Object System.Drawing.Font('tahoma',12)


   $tag_Action                      = New-Object system.Windows.Forms.Label

   $tag_Action.text                 = $action

   $tag_Action.width                = 140

   $tag_Action.height               = 20

   $tag_Action.location             = New-Object System.Drawing.Point(($tag_Result.Location.X + $tag_Result.Width + 10), $h)

   $tag_Action.Font                 = New-Object System.Drawing.Font('tahoma',12)


   $tag_Time                        = New-Object system.Windows.Forms.Label

   $tag_Time.text                   = $time

   $tag_Time.width                  = 190

   $tag_Time.height                 = 20

   $tag_Time.location               = New-Object System.Drawing.Point(($tag_Action.Location.X + $tag_Action.Width + 10), $h)

   $tag_Time.Font                   = New-Object System.Drawing.Font('tahoma',12)


   $tag_ID                          = New-Object system.Windows.Forms.Label

   $tag_ID.text                     = $id

   $tag_ID.width                    = 50

   $tag_ID.height                   = 20

   $tag_ID.location                 = New-Object System.Drawing.Point(($tag_Time.Location.X + $tag_Time.Width + 10), $h)

   $tag_ID.Font                     = New-Object System.Drawing.Font('tahoma',12)


   # If it's the first line - header line - #0, the colomn of Message contains header.

   if ($count -eq 0) {

       $Message                           = New-Object System.Windows.Forms.Label

   } else {

       # Else - Fore any line of event, Messege is a button to popup a window with the entire event message.

       $Message                           = New-Object System.Windows.Forms.Button

       # When clicking the button, do the action configured above (line 43).

       $Message.add_click($do)

   }

   # All the other proprties of Message are always the same.

   $Message.width                     = 80

   $Message.height                    = 20

   $Message.location                  = New-Object System.Drawing.Point(($tag_ID.Location.X + $tag_ID.Width + 10), $h)

   $Message.Font                      = New-Object System.Drawing.Font('tahoma',12)

   $Message.text                      = "Message"


   # Add all objects to the base window of result.

   $Result.Controls.AddRange(@($tag_ActBy, $tag_Target, $tag_Result, $tag_Action, $tag_Time, $tag_ID, $Message))

}


################################ Form ################################


# Creates the base window of the GUI tool.

$GUI                               = New-Object system.Windows.Forms.Form

$GUI.ClientSize                    = New-Object System.Drawing.Point(750,400)

$GUI.text                          = "Show User Changes"

$GUI.TopMost                       = $false


################################ User ################################


# Creates the objects for the username part - where input the user which had been changed.

$user                              = New-Object system.Windows.Forms.TextBox

$user.multiline                    = $false

$user.width                        = 170

$user.height                       = 20

$user.location                     = New-Object System.Drawing.Point(134,25)

$user.Font                         = New-Object System.Drawing.Font('tahoma',10)


$tag_user                          = New-Object system.Windows.Forms.Label

$tag_user.text                     = "User Name"

$tag_user.AutoSize                 = $true

$tag_user.width                    = 35

$tag_user.height                   = 10

$tag_user.location                 = New-Object System.Drawing.Point(40,25)

$tag_user.Font                     = New-Object System.Drawing.Font('tahoma',12)


################################ Events ################################


# Creates the objects for the event types part - where checking the boxs of the events to find.

$tag_eventid                       = New-Object system.Windows.Forms.Label

$tag_eventid.text                  = "Select The type of change you want to monitor:"

$tag_eventid.AutoSize              = $true

$tag_eventid.width                 = 100

$tag_eventid.height                = 10

$tag_eventid.location              = New-Object System.Drawing.Point($tag_user.Location.X,($tag_user.Location.Y + 40))

$tag_eventid.Font                  = New-Object System.Drawing.Font('tahoma',12)


$tag_selectall                     = New-Object system.Windows.Forms.Label

$tag_selectall.text                = " - Keep empty if you want to select all"

$tag_selectall.AutoSize            = $true

$tag_selectall.width               = 100

$tag_selectall.height              = 10

$tag_selectall.location            = New-Object System.Drawing.Point($tag_eventid.Location.X,($tag_eventid.Location.Y + 25))

$tag_selectall.Font                = New-Object System.Drawing.Font('tahoma',10, [System.Drawing.FontStyle]::Italic)


$4720                              = New-Object system.Windows.Forms.CheckBox

$4720.text                         = "4720 - A user account was created"

$4720.AutoSize                     = $false

$4720.width                        = 500

$4720.height                       = 20

$4720.location                     = New-Object System.Drawing.Point($tag_eventid.Location.X,($tag_selectall.Location.Y + 30))

$4720.Font                         = New-Object System.Drawing.Font('tahoma',12)


$4722                              = New-Object system.Windows.Forms.CheckBox

$4722.text                         = "4722 - A user account was enabled"

$4722.AutoSize                     = $false

$4722.width                        = 500

$4722.height                       = 20

$4722.location                     = New-Object System.Drawing.Point($4720.Location.X,($4720.Location.Y + 30))

$4722.Font                         = New-Object System.Drawing.Font('tahoma',12)


$4725                              = New-Object system.Windows.Forms.CheckBox

$4725.text                         = "4725 - A user account was disabled"

$4725.AutoSize                     = $false

$4725.width                        = 500

$4725.height                       = 20

$4725.location                     = New-Object System.Drawing.Point($4722.Location.X,($4722.Location.Y + 30))

$4725.Font                         = New-Object System.Drawing.Font('tahoma',12)


$4723                              = New-Object system.Windows.Forms.CheckBox

$4723.text                         = "4723 - An attempt was made to change an account's password"

$4723.AutoSize                     = $false

$4723.width                        = 500

$4723.height                       = 20

$4723.location                     = New-Object System.Drawing.Point($4725.Location.X,($4725.Location.Y + 30))

$4723.Font                         = New-Object System.Drawing.Font('tahoma',12)


$4724                              = New-Object system.Windows.Forms.CheckBox

$4724.text                         = "4724 - An attempt was made to reset an account's password"

$4724.AutoSize                     = $false

$4724.width                        = 500

$4724.height                       = 20

$4724.location                     = New-Object System.Drawing.Point($4723.Location.X,($4723.Location.Y + 30))

$4724.Font                         = New-Object System.Drawing.Font('tahoma',12)


$4738                              = New-Object system.Windows.Forms.CheckBox

$4738.text                         = "4738 - A user account was changed"

$4738.AutoSize                     = $false

$4738.width                        = 500

$4738.height                       = 20

$4738.location                     = New-Object System.Drawing.Point($4724.Location.X,($4724.Location.Y + 30))

$4738.Font                         = New-Object System.Drawing.Font('tahoma',12)


$4781                              = New-Object system.Windows.Forms.CheckBox

$4781.text                         = "4781 - The name of an account was changed"

$4781.AutoSize                     = $false

$4781.width                        = 500

$4781.height                       = 20

$4781.location                     = New-Object System.Drawing.Point($4738.Location.X,($4738.Location.Y + 30))

$4781.Font                         = New-Object System.Drawing.Font('tahoma',12)


################################ Date ################################


# Creates the objects for the dates part - where input the date range of time to search for events.

$tag_date_format                   = New-Object system.Windows.Forms.Label

$tag_date_format.text              = "Insert date in `ndd/MM/yyyy format"

$tag_date_format.AutoSize          = $true

$tag_date_format.width             = 35

$tag_date_format.height            = 10

$tag_date_format.location          = New-Object System.Drawing.Point(($tag_user.Location.X + 510), $tag_user.Location.Y)

$tag_date_format.Font              = New-Object System.Drawing.Font('tahoma',12)


$tag_date_from                     = New-Object system.Windows.Forms.Label

$tag_date_from.text                = "Date - From:"

$tag_date_from.AutoSize            = $true

$tag_date_from.width               = 35

$tag_date_from.height              = 10

$tag_date_from.location            = New-Object System.Drawing.Point($tag_date_format.Location.X, $4720.Location.Y)

$tag_date_from.Font                = New-Object System.Drawing.Font('tahoma',12)


$date_from                         = New-Object system.Windows.Forms.TextBox

$date_from.multiline               = $false

$date_from.width                   = 170

$date_from.height                  = 20

$date_from.location                = New-Object System.Drawing.Point($tag_date_format.Location.X, $4722.Location.Y)

$date_from.Font                    = New-Object System.Drawing.Font('tahoma',10)


$tag_date_to                       = New-Object system.Windows.Forms.Label

$tag_date_to.text                  = "Date - To:"

$tag_date_to.AutoSize              = $true

$tag_date_to.width                 = 35

$tag_date_to.height                = 10

$tag_date_to.location              = New-Object System.Drawing.Point($tag_date_format.Location.X, $4723.Location.Y)

$tag_date_to.Font                  = New-Object System.Drawing.Font('tahoma',12)


$date_to                           = New-Object system.Windows.Forms.TextBox

$date_to.multiline                 = $false

$date_to.width                     = 170

$date_to.height                    = 20

$date_to.location                  = New-Object System.Drawing.Point($tag_date_format.Location.X, $4724.Location.Y)

$date_to.Font                      = New-Object System.Drawing.Font('tahoma',10)


# Add all objects configured above, to the GUI tool window.

$GUI.controls.AddRange(@($user, $tag_user, $tag_eventid, $tag_selectall, $4720, $4722, $4725, $4723, $4724, $4738, $4781,`

$tag_date_format, $tag_date_from, $date_from, $tag_date_to, $date_to))


################################ Line ################################


# Add lines to the GUI tool window, to separate between sections of objects.

$line = $GUI.createGraphics()

$pen = new-object Drawing.Pen black

# Vertical

$GUI.add_paint({$line.DrawLine($pen, ($tag_user.location.X + 500), ($tag_user.location.y), ($tag_user.location.X + 500), ($4781.location.y + 20))})

# Under UserName - Horizonal.

$GUI.add_paint({$line.DrawLine($pen, ($tag_user.location.X), ($tag_user.location.y + 30), ($tag_user.location.X + 500), ($tag_user.location.y + 30))})


################################ Buttons ################################


# Creates the buttons at the bottom of the window.

$Find                              = New-Object System.Windows.Forms.Button

$Find.width                        = 80

$Find.height                       = 40

$Find.location                     = New-Object System.Drawing.Point(245, ($4781.location.y + 50))

$Find.Font                         = New-Object System.Drawing.Font('tahoma',12)

$Find.text                         = "Find"


$Close                             = New-Object System.Windows.Forms.Button

$Close.width                       = 80

$Close.height                      = 40

$Close.location                    = New-Object System.Drawing.Point((($Find.Location.X) + 90), ($4781.location.y + 50))

$Close.Font                        = New-Object System.Drawing.Font('tahoma',12)

$Close.text                        = "Close"

# To cleare memory space and avoid the powershell to get stuck, close the form and reset all of it's content

# to a simple variable - while clicking the Close button.

$Close.Add_Click({

   $GUI.Close()

   $GUI = 0

})


$Help                              = New-Object System.Windows.Forms.Button

$Help.width                        = 80

$Help.height                       = 40

$Help.location                     = New-Object System.Drawing.Point((($Close.Location.X) + 90), ($4781.location.y + 50))

$Help.Font                         = New-Object System.Drawing.Font('tahoma',12)

$Help.text                         = "Help"


<# You can add Explanation of the proccess and the ways to use it into a text file.

Place that text file in the same folder with the CSV files. Than, anytime clicking the button Help, the text file will open.

If there is no such file in that location, nothing will happend. #>

$Help.Add_Click({

   if (Test-Path ($path + "Help.txt")){

       Start-Process ($path + "Help.txt")}

})


# Add buttons to the GUI tool window.

$GUI.Controls.AddRange(@($Find, $Close, $Help))


################################ Main Process ################################


# Add Button event - What's happend when clocking the button Find.

$Find.Add_Click({


   # Check if the dates input is there, and in the correct format.

   # If it's correct, continue with the proccess.

   if (([DateTime]::TryParseExact($date_from.Lines[0], 'dd/MM/yyyy', [System.Globalization.CultureInfo]::InvariantCulture, `

   [System.Globalization.DateTimeStyles]::None, [ref](Get-Date))) `

    -and `

    ([DateTime]::TryParseExact($date_to.Lines[0], 'dd/MM/yyyy', [System.Globalization.CultureInfo]::InvariantCulture, `

    [System.Globalization.DateTimeStyles]::None, [ref](Get-Date)))) {


       # Put all events type check boxes into arraym and get thos which are checked.

       $events = $4720, $4722, $4725, $4723, $4724, $4738, $4781

       $checked = $events | ?{$_.checked -eq $true} | %{$_.text.substring(0,4)}

       # Get the strings from the date input boxes, and convert it to date objects.

       $from = [datetime]::parseexact($date_from.Lines[0], 'dd/MM/yyyy', $null)

       $to = [datetime]::parseexact($date_to.Lines[0], 'dd/MM/yyyy', $null)


       # Get the user name from it's input box into a string. If the box is empty, create empty string.

       if ($user.Lines[0] -ne $null) {$userinput = $user.Lines[0]}

       else {$userinput = ""}


       # If no event type had been chosen, consider all as checked.

       if ($checked -eq $null) {$checked = $events | %{$_.text.substring(0,4)}}

       # If last date in time range found as earlier than first date, popup message box to the user to insert the date again.

       if ($to -lt $from) {$pop.Popup("Last date is earlier than first date!")}


       # Get all the files that contains event from the time range defined by the user.

       $files = @()

       $from1 = [datetime]::parseexact(($from.tostring('MM-yyyy')), 'MM-yyyy', $null)

       while (!($from1 -gt $to)) {

           $files += $from1.tostring('MM-yyyy')

           $from1 = $from1.AddMonths(1)

       }


       # Loop over all the files found above, and from each, collect ell event within the time range.

       $all = @()

       foreach ($file in $files) {

           if (Test-Path ($path + $file + ".csv")) {

               $logs = Import-Csv -path ($path + $file + ".csv") | ?{$_.target -match $userinput} | ?{$_.id -in $checked.split(" ")} | `

               ?{(([datetime]::parseexact($_.TimeCreated.Split(" ")[0], 'dd/MM/yyyy', $null)) - $from) -ge 0 `

               -and ($to - ([datetime]::parseexact($_.TimeCreated.Split(" ")[0], 'dd/MM/yyyy', $null))) -ge 0}

               $all += $logs

           }

       }


       # Create the form of the result window, and insert the header line.

       PopResult

       AddLine -count 0


       # Loop over all events found in the time range, and create a line for each, in the result window.

       $count = 1

       foreach ($x in $all){

           AddLine -whole $x.Message -actby $x.ActBy -target $x.Target -res ($x.Result.Split(" ")[1]) `

           -action ($x.Action.Split(" ")[5] + " " + $x.Action.Split(" ")[-1].substring(0, 8)) `

           -time $x.TimeCreated -id $x.Id -count $count

           $count ++

       }


       <# Configure the size of the result window according to the numbers of lines in it.

       Up to 20 lines, the window hight determained to wrap the lines. From 20 lines and above, the size of the window is set,

       and the user can scroll down to the other lines. #>

       if ($count-lt 20) {$Result.Height = (($count * 25) + 130)}

       else {$Result.Height = 800}


       # Create Close button to the result window.

       $resclose                          = New-Object System.Windows.Forms.Button

       $resclose.width                    = 80

       $resclose.height                   = 40

       $resclose.location                 = New-Object System.Drawing.Point((($Result.Width - $resclose.Width) / 2), (($count * 25) + 40))

       $resclose.Font                     = New-Object System.Drawing.Font('tahoma',12)

       $resclose.text                     = "Close"


       # The Close button closes the form and reset the complex object of the form to small and simple variable of integer.

       $resclose.Add_Click({

           $Result.Close()

           $Result = 0

       })


       # Add the Close button to the result window form objects, than present the window.

       $Result.Controls.Add($resclose)

       $Result.ShowDialog()


   } else {

       # If the dates from the input boxs arn't in the correct format,

       # or it's empty - popup a messege and do nothing else.

       $pop.Popup("You must insert dates! `nPlease insert date in the right format!")

   }

})


[void]$GUI.ShowDialog() .
Appendix B - Content for the Help File:
Paste the content of this appendix into a txt file and place it in the tool’s folder with the code file.
You need to link the file to the reference in the Help button action.
 Created by Yosi Cohen

https://www.linkedin.com/in/yosi-cohen/


==========================================================


This tool designed to find and track changes on Active Directory Accounts.


Use cases for this tool:

Sometimes you find something weird or something that isn't according to the organization policy,

or that isn't by the convention you use to work with.

This tool will help you to find out who did it and when.


==========================================================


Using the mean window:

You can track accounts changes, according to 3 search filters:

1. Account Name (refer as User Name).

2. Event type - which type of change you are looking for.

3. Time range.


The first 2 filters aren't necessary and you can work without it. If you live it empty, there

will be no filter in this field.

But the date filter is a must, and the process will not start without a time range to search

within its boundaries.


The time Range is the most important key, and it's must be there in the correct format mentioned

in the GUI.

Therefore, before the process will run to find result, variety of checks are performed to make

it certain that the date inserted can make a time frame that the process can work with.


After the user inserts his desired filters, he can press Find button to get the result.

Then a result window will pop and present the result in a format of table, where each line

represents an event.


The user can press Close button to end the process and close the window, and reset all the variables

and memory space required for it.


The last button is Help, intended to show this information about the tool and how to use it.


==========================================================


Get the result window:

After the user had configured the search filters and place the dates correct for time range,

he can press Find button to show the result window.

Note that if the filter covers too many results, it will take a while to build the result window for it.

If the search is well filtered and the result are few, it will popup right away.


==========================================================


The structure of the result window:

The result window is structured as a table.

There is the header, and every event found by the search get its own line.


Each line contains these elements:

1. ActBy - The account who made that change and cause that event.

2. Target - The account that had been changed.

3. Result - Indicates if the action end with success or a failure.

4. Action - A word or 2 to describe the action on that account.

5. TimeCreated - Timestamp of the moment of the event.

6. Event - The EventID - The code number of the action made.

7. Message - The entire log message of that event.

  Sometimes the information from the fields above is not enough.

  Sometimes you want to read the entire log message - mostly in an event type

  of "Account was changed". In this case you want to check which attribute had change,

  and this information appear in the log message.


  Message is a button to click, and click on it will pop up a message box contains the

  entire log message.


The height of the result window depends on the number of the lines.

Up to 20 lines, the height of the window will grow to wrap the lines.

From 20 lines and above, the height of the window will set, and the user can scroll up and down to see

another lines.


At the bottom of the result window there is a Close button, to close the window and the form object.

It's to reset the big and complex variable of the form, to a simple and small variable of an integer.

When there are 20 lines and more, the user need to scroll down to find the Close button.
Appendix C - Turning the Script into a File Run from an Icon:
-
Save all the code into a PowerShell file - with the ps1 extension.
-
Go to the location where you want to place the icon that will run the tool - say, the desktop.
Right-click on the desktop or on an area in a folder > New > Shortcut.
-
A window will open where you need to enter the path the shortcut will point to. You need to enter the following text:
C:\Windows\System32\WindowsPowerShell\v1.0\powershell.exe -windowstyle hidden -file "c:\folder\ScriptFile.ps1"-
Replace the string at the end inside the parentheses (after the file parameter) with the location where the file containing the code is saved.
-
Confirm and close.
-
Open the shortcut’s properties, go to the Shortcut tab, and in the Start in field place the path to the PowerShell executable file:
C:\Windows\System32\WindowsPowerShell\v1.0-
A little below that, click Change Icon and choose whichever icon you want to appear on the shortcut.
There are many websites through which you can convert image files to a small icon file that fits, so you can create whatever symbol you want for the tool.
-
Confirm and close.
-
Don’t forget to save the content of Appendix B into a text file named Help.txt and place it in the folder where the CSV files that the tool works with are located.