Tracking Certificates Issued by the Enterprise Certificate Authority
A PowerShell script for tracking and filtering certificates issued by the enterprise Certificate Authority. Designed for Microsoft Certificate Services.
Hello everyone.
Today my excuse to talk about PowerShell is encryption certificates.
In Microsoft’s general update for May 2022, a fix was included that adds a specific field to certificates. This field allows linking a certificate to a user in a stronger and more reliable way than the method used until now. The field contains the user’s SID and ensures stronger and more reliable authentication.
Until now, in order to link a certificate to a user, the certificate was issued based on a username, and that’s how the system knew that this user was associated with the certificate and could be trusted. Over the years, problems were discovered with this way of linking certificates to users. Attackers managed to impersonate the username in its various forms, and could thus use the certificate that authenticated their false identity against Active Directory.
In organizations that apply updates immediately after they are released, a lot of noise and commotion arose. Users and computers were required to authenticate themselves using means that were not yet available to them, or due to failures that sometimes occur in Microsoft updates - at which point Microsoft releases another update to fix the previous one.
In the meantime, IT staff were required to revert this new authentication from enforcement mode back to preparation mode, until the update-to-the-update was installed, and until all users and computers had switched to using the new certificates.
You can see in the DC logs those who are still connecting with the old certificates. In enforcement mode, the log shows an error. In preparation mode, the log shows a warning. But to switch to enforcement mode, we would want to get a more comprehensive picture, and perhaps also track the process according to which it was decided to take action in order to transition to the new certificates - those that contain the new field.
So to start, how do you check if a certificate has received the new field?
-
Through the regular user interface, open the command prompt as an administrator.
-
Type the MMC command.
-
In the console that opens, click on File and select Add/Remove Snap-In.
-
From the list of available Snap-Ins, choose Certificate.
-
A choice appears between user certificates or computer certificates. You can choose either.
-
Once the Snap-In is loaded, go to the Personal folder and then into the Certificate subfolder.
-
There will be a certificate bearing the name of the user or computer. Double-clicking on it will open the certificate data.
-
Switch to the Details tab. This is a Key-Value style table.
-
Scroll down and look for a field that, instead of a regular name, contains the following number sequence - ‘1.3.6.1.4.1.311.25.2’
-
If this field is there, you have the new certificate. If not, you can request a new certificate following the steps below:
-
Right-click to pop up a menu.
-
Select All Tasks and then Request Certificate with new key.
-
Go through the short process at the end of which you click Enroll, and you have a new certificate.
-
If the new certificate also lacks the field, the update has not yet been installed on your servers.
Tracking all user and computer certificates:
To track the overall picture across the organization, I wrote a script that pulls from the Certificate Authority all issued certificates, filters out those intended for computer and user authentication (as opposed to those used for Web server authentication or other purposes), and then performs additional filtering.
In the end, tables should be produced containing details about user and computer certificates, and which of them contain the new field.
Below I will explain the operation of the script, which will be included at the end as an appendix.
The script contains very detailed documentation - almost annoyingly thorough - and explains the activity of each step.
Here I will provide a Hebrew-language explanation of the flow of the process, and how it can be changed or customized according to the user’s wishes.
First Function - Get-Certs:
Lines 4-48.
In principle, this function is designed to pull certificate data from the Certificate Authority.
In our case, there is a full match to the purpose for which the entire script was written - to pull specific data about issued certificates in order to discover which of them contain the new field.
But anyone who wants to can adapt the data they want to pull according to their preferences.
Here I will give a detailed explanation of the operations in the first half of the function, so that anyone who wants to can make the changes they need.
As can be seen in the documentation, the first two lines (lines 7-8) are intended to open a connection to the Certificate Authority. The user needs to know the name of their Certificate Authority server, and there to open the Certificate Manager through the Tools menu in Server Manager.
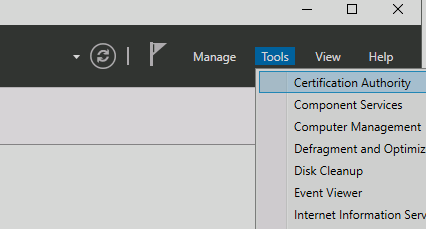 Opening the Certificate Service
Certificate Service:
A Certificate Authority console opens, and underneath it in the hierarchy is the Certificate Manager itself - by its name. This name is what we need to enter in the script on line eight, in the format written there. From left to right - server name, slash, Certificate Manager name.
The next paragraph determines the data that the script will pull from the Certificate Manager’s database.
Anyone who opens the Certificate Manager console and selects the Issued Certificates folder can see a displayed table with many columns, each showing a different type of data, with each row representing a different certificate.
In the View menu of the console there is an Add/Remove column command. Clicking it opens a panel where you can customize the display to contain only the data columns the user wants to see.
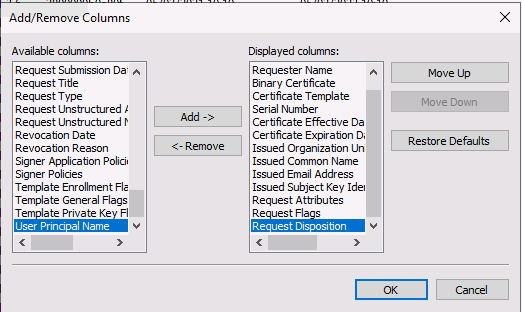 Managing columns in the certificates table
From all of these the user needs to choose what data they need. Then enter inside the parentheses in line 13 the number of columns selected, and adapt the following lines accordingly. If you need to reduce or increase the number of following lines according to the number of columns, that’s what you do.
For example:
Someone who selected 8 columns would enter the number 8 inside the parentheses on line 13. Then in the following lines they would provide rows for indices from 0 to 7. Where in the parentheses at the end of each line, after False and the comma, they would put in quotes the name of the column they chose.
Then you need to place all these indices in a line, with a Pipeline at the end that feeds them all into the requested column display - similar to the current example we have on line 19.
Line twenty gives us an example of filtering the display based on information from one of the columns. I chose to filter the table content so that only rows with the value 20 at index 4 come through.
What does that mean?
Anyone who goes back to the Certificate Manager console and chooses to display the Request Disposition column will see that the number 20 represents Issued Certificates. So if I want to display only Issued Certificates, I issue the SetRestriction command - which is the filter command - and tell it to filter by the column at index 4, showing only what has the value 20 there.
Another example - if I wanted to filter and display only certificates issued in the name of Yosi Cohen, I could put at the beginning of the parentheses index 0 which contains the username, and at the end of the parentheses instead of 20 put in quotes my name as it appears in my certificates. Because the Requester Name column contains usernames in NetBios format - meaning Domain\User. Since this is a string, it needs to be put in quotes - unlike the number 20 that was there before.
Now, after explaining in detail how the building and definition of the table pulled from the Certificate Manager’s database works, it’s possible to know how to adapt the function’s operation so that it displays to the user any information they need from there according to their needs.
The rest of the function is simpler.
After that, a nested loop runs through all the rows in the defined table (according to the filter), and within each row goes through all the defined columns (according to the column selection made). And so the variable $AllCerts from line 27 collects an array, with each item in the array containing data about a different certificate.
Anyone who changed the column definition as I explained above, will also need to change the last lines in the function, which take each column name and change it to a single-word name. Currently the column names are defined according to the columns I chose. Anyone who chooses different columns will need to change this command accordingly.
Finally on line 47 the function returns the list of certificates - filtered. Only certificates that have not yet expired.
Second Function - Add-CertExtentions:
Lines 53-70.
This function can indeed serve other purposes for those who want. But here it is intended to serve one purpose - to collect from each certificate the information that contains the fields among which the new field should appear.
From all the data displayed in the table on the Certificate Authority server, I was unable to find where these fields are visible.
This function takes the binary code of the certificate - as certificates appear in hashed text - and translates it into a certificate object. Under this object you can find the fields among which the new field should appear.
The function receives the certificate data array, adds a new column to it, and in this column enters for each certificate all the fields it found in the Extensions category of that certificate.
The function returns the new array - a table nearly identical to the previous one, with the addition of a new extensions column.
Third Function - Insert-Info:
Lines 76-94.
This function receives a table of certificate data, then calls the previous function (the second) to add the extensions column to the table.
After that, the current function (the third) processes the column containing the username. Where previously the column contained a username in NetBios format including the domain, now the column contains the username alone.
Then the function adds two more columns to the table. In the first column the function enters for each certificate the Boolean value that says whether the certificate contains the new field, and in the second the number of days remaining until the certificate expires.
The function returns the table with all the new fields.
Fourth Function - Group-Data:
Lines 101-138.
All the functions above gave us a lot of information about various certificates. The thing is that a user can connect from different computers, and for each one the server will issue them a user authentication certificate. This is a large scattered set of data that focuses more on small details and less on the overall picture.
To get a more general picture, the fourth function receives a table of certificate data and concentrates them under groups. All certificates issued for a specific object (whether that’s a computer/server or a user) are gathered under the same group.
Additionally the function queries Active Directory to get more details about the object.
Thus the function creates a new table that gives us the following data:
-
Object name.
-
How many certificates were found in total for the object.
-
How many of them contain the new field.
-
How many of them do not contain the new field.
-
The last logon date of the object to the organizational network.
-
How many days have passed since the last logon of the object.
-
Whether the object appears as active or disabled in Active Directory.
The Script Flow:
At the start, variables are defined containing the code of the certificate template that interests us. Based on these we will later filter the data and go through only certificates belonging to these templates. The template code can be found in the Certificate Manager under the Certificate Template column, or within each certificate in the Details tab.
Both in the Certificate Manager and within the certificate itself, the template name will initially be displayed. But for the script only the numeric code in parentheses is needed. Copy and place in the variable.
In the current script a variable was defined for a user certificate and another variable for a computer certificate.
There are many other templates such as web server templates, templates for LDAP, Kerberos, custom templates and more. Anyone who wants to search for and process certificates of another type needs to set a variable with the template code for that certificate type.
After the certificate types are defined, a call is made to the first function. This connects to the Certificate Authority and produces a general table of issued certificates, which sits inside a variable.
The script performs filtering from the table and places into one variable a user-certificate table, and into another - a computer-certificate table.
Then the script calls the function that will insert the extensions and other data into both tables.
Finally, four tables are exported to four files.
Each certificate type generates two files - one file with detailed extended information for each certificate, a second file with the overall picture of the number of certificates for each object.
The script ends with two commands that disconnect the connection to the Certificate Authority.
The Code:
# This function connecting to CA server and retrieving certificates details
# Specificly here, issued certificates.
# The function returns an array object of all issued certificates.
function Get-Certs {
# Open Object to View the CA DataBase, and connect to it.
$CertDB = New-Object -ComObject CertificateAuthority.View
$CertDB.OpenConnection("CA-Server-Name\CA-Name")
# Choose which columns to get, and filter results by index4 - which represents the different folders in the CA.
# 20 is the code for Request Disposition of Issued Certificates.
# Means that we want to get only issued certificates, not requests or others.
$CertDB.SetResultColumnCount(5)
$index0 = $CertDB.GetColumnIndex($false, "Requester Name")
$index1 = $CertDB.GetColumnIndex($false, "Certificate Template")
$index2 = $CertDB.GetColumnIndex($false, "Certificate Expiration Date")
$index3 = $CertDB.GetColumnIndex($false, "Binary Certificate")
$index4 = $CertDB.GetColumnIndex($false, "Request Disposition")
$index0, $index1, $index2, $index3, $index4 | %{$CertDB.SetResultColumn($_)}
$CertDB.SetRestriction($index4,1,0,20)
# Open access to the table defined above. Begin before the top row and before the first column.
$CertDBRow = $CertDB.OpenView()
$CertDBRow.Reset()
# Array to receive all certs details.
$AllCerts = @()
# Go through all rows
for ($x = 0; $CertDBRow.Next() -ne -1; $x++) {
# Get access to all column in the row
$cell = $CertDBRow.EnumCertViewColumn()
# Object to receive all values of the cells in this row
$cert = New-Object -TypeName PsObject
# Go through all columns
for ($x = 0; $cell.Next() -ne -1; $x++) {
# Add to the array object all values in the row. header for each value got the display name of the column in the DB.
$cert | Add-Member -MemberType NoteProperty -Name $cell.GetDisplayName() -Value $cell.GetValue(1) -Force
}
# Add the row values - which represent 1 certificate, to an array of certificates.
$AllCerts += $cert
}
# Change headers names. make it easier to access and write it.
$new = $AllCerts | Select @{N='Name'; E={$_.'Requester Name'}}, @{N='Template' ;E={$_.'Certificate Template'}}, `
@{N='Expiry' ;E={$_.'Certificate Expiration Date'}}, @{N='Binary' ;E={$_.'Binary Certificate'}}
# Return an array of all certificates information.
return $new | ?{($_.Expiry - (Get-Date)).days -gt 0}
}
# This function decoding the binary certificate within the certificates, in manner to retrieve certificate extentions data.
# The function receive an array of certificates, and add the extentions data to all of them.
# The function returns an array of certs - include extentions data.
function Add-CertExtentions {
param ($certs)
# Add column for certificate extention data.
$certs | Add-Member -MemberType NoteProperty -Name 'Extentions' -Value $null -Force
foreach ($x in $certs) {
# Create object handeling certificate data.
$cert = New-Object System.Security.Cryptography.X509Certificates.X509Certificate2
# Takes the hash of the binary certificate and torn it into a single string.
$binary = ($x.Binary.Split("`n")) -join ''
# Decode the base64 certificate from the string to retrive certificate data. makes it certificate object.
$cert.Import([Convert]::FromBase64String($binary))
# Insert certificate extention data into the new cell created above.
$x.Extentions = $cert.Extensions.oid
}
# Returns all certificates with the extention data included
return $certs
}
<# This function proccess the certificate data and return specific fata required.
The function receive list of certificate, use another function to add extention data and proccess it.
The function returns a table, telling each cert weather it's contains the new OID, when it's expires - and then
will renew itself, etc. #>
function Insert-Info {
param ($list)
# Call function to add extentions details of the certs
$ExtendedCerts = Add-CertExtentions -certs $list
# Filter the name of user or computer own that certificate, to get the name identity like in Active-Diretory.
$ExtendedCerts | %{$_.Name = $_.Name.split("\")[1]}
# Add cells for the information if the certificate got the new OID and days to expiration.
$ExtendedCerts | Add-Member -MemberType NoteProperty -Name 'NewCert' -Value $null -Force
$ExtendedCerts | Add-Member -MemberType NoteProperty -Name 'DaysToExpiry' -Value $null -Force
$date = Get-Date
foreach ($x in $ExtendedCerts) {
# For each certs, insert info to the new cells created above
$x.NewCert = '1.3.6.1.4.1.311.25.2' -in $x.Extentions.value
$x.DaysToExpiry = ($x.Expiry - ($date)).days
}
# Returns the list of all certs, includes if the new OID is there.
return $ExtendedCerts
}
<# This function gives the final graining to the data.
User or Computer can have more than a single certificate. to concetrate all the information regarding a user or computer,
this function groups all certificates related with the user (or computer), and count how many of it contains the new OID,
and more data.
The function receive an array of certificates info, and return an array of users/computers info, related with certs. #>
function Group-Data {
param($list, $type)
# Group all certificates issued for this name.
$groups = $list | Group-Object -Property name
# Add some properties to the array, to give good picture about the users/computers and their crtificates.
$groups | Add-Member -MemberType NoteProperty -Name 'LastLogOn' -Value $null -Force
$groups | Add-Member -MemberType NoteProperty -Name 'DaysFromLastLogOn' -Value $null -Force
$groups | Add-Member -MemberType NoteProperty -Name 'Enabled' -Value $null -Force
$groups | Add-Member -MemberType NoteProperty -Name 'NewCerts' -Value $null -Force
$groups | Add-Member -MemberType NoteProperty -Name 'OldCerts' -Value $null -Force
$groups | Add-Member -MemberType NoteProperty -Name 'Type' -Value $null -Force
$date = Get-Date
# Go through all groups to check and add information to each of them.
foreach ($x in $groups) {
# Try get user/computer info from Active-Directory
try {
if ($type -eq 'user') {
$adinfo = Get-ADUser -Identity $x.Name -Properties Enabled, lastLogonTimestamp
} else {$adinfo = Get-ADComputer -Identity ($x.Name.Split("$")[0])}
# If the AD query failes, means that the subject is not there anymore. mark as irelevant.
} catch {
$adinfo = '' | select enabled, lastLogonTimestamp
$adinfo.enabled = 'Not Found'
$adinfo.lastLogonTimestamp = 0
}
# Insert data into the properties - if the user enable/disable, last time he logged on,
# hoe many of it's certificates have the new OID, etc.
$x.Enabled = $adinfo.enabled
$x.LastLogOn = [DateTime]::FromFileTime($adinfo.lastLogonTimestamp)
$x.DaysFromLastLogOn = -(($x.LastLogOn - ($date)).days)
$x.NewCerts = ($x.Group.newcert | ?{$_ -eq $true}).count
$x.OldCerts = ($x.Group.newcert | ?{$_ -eq $false}).count
}
# Return only info about subjects that found as enabled in Active-Directory. with the followed properties.
$valid = $groups | ?{$_.Enabled -eq $true}
return $valid | select Name, Count, NewCerts, OldCerts, LastLogOn, DaysFromLastLogOn, Type
}
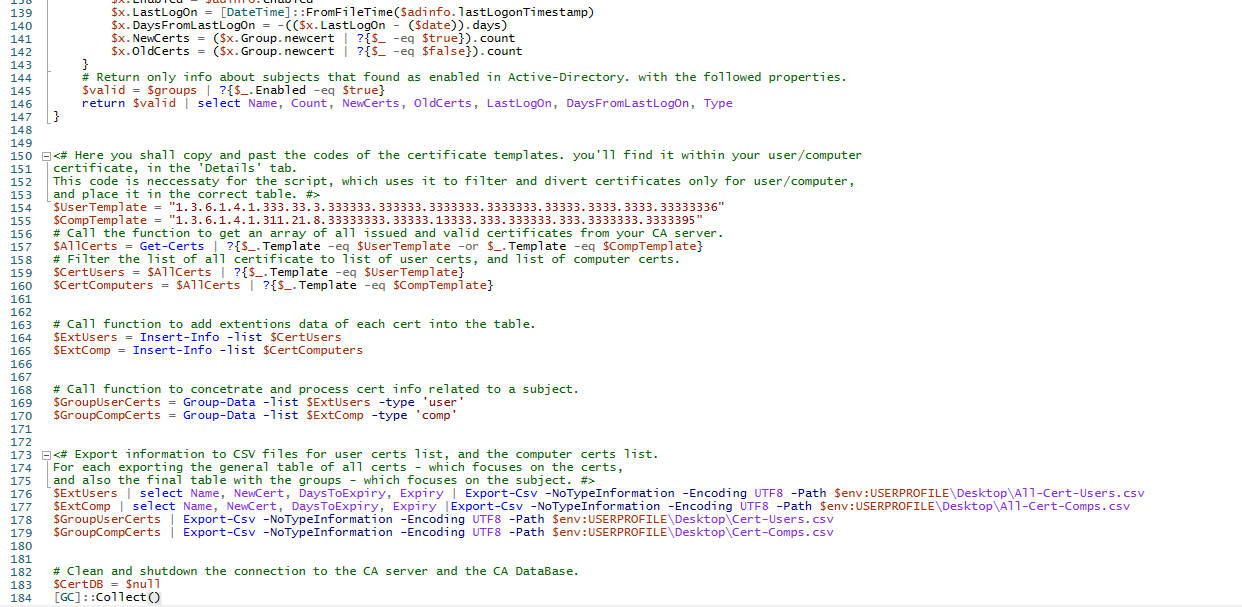
<# Here you shall copy and past the codes of the certificate templates. you'll find it within your user/computer
certificate, in the 'Details' tab.
This code is neccessaty for the script, which uses it to filter and divert certificates only for user/computer,
and place it in the correct table. #>
$UserTemplate = "1.3.6.1.4.1.333.33.3.333333.333333.3333333.3333333.33333.3333.3333.33333336"
$CompTemplate = "1.3.6.1.4.1.311.21.8.33333333.33333.13333.333.333333.333.3333333.3333395"
# Call the function to get an array of all issued and valid certificates from your CA server.
$AllCerts = Get-Certs | ?{$_.Template -eq $UserTemplate -or $_.Template -eq $CompTemplate}
# Filter the list of all certificate to list of user certs, and list of computer certs.
$CertUsers = $AllCerts | ?{$_.Template -eq $UserTemplate}
$CertComputers = $AllCerts | ?{$_.Template -eq $CompTemplate}
# Call function to add extentions data of each cert into the table.
$ExtUsers = Insert-Info -list $CertUsers
$ExtComp = Insert-Info -list $CertComputers
# Call function to concetrate and process cert info related to a subject.
$GroupUserCerts = Group-Data -list $ExtUsers -type 'user'
$GroupCompCerts = Group-Data -list $ExtComp -type 'comp'
<# Export information to CSV files for user certs list, and the computer certs list.
For each exporting the general table of all certs - which focuses on the certs,
and also the final table with the groups - which focuses on the subject. #>
$ExtUsers | select Name, NewCert, DaysToExpiry, Expiry | Export-Csv -NoTypeInformation -Encoding UTF8 -Path $env:USERPROFILE\Desktop\All-Cert-Users.csv
$ExtComp | select Name, NewCert, DaysToExpiry, Expiry |Export-Csv -NoTypeInformation -Encoding UTF8 -Path $env:USERPROFILE\Desktop\All-Cert-Comps.csv
$GroupUserCerts | Export-Csv -NoTypeInformation -Encoding UTF8 -Path $env:USERPROFILE\Desktop\Cert-Users.csv
$GroupCompCerts | Export-Csv -NoTypeInformation -Encoding UTF8 -Path $env:USERPROFILE\Desktop\Cert-Comps.csv
# Clean and shutdown the connection to the CA server and the CA DataBase.
$CertDB = $null
[GC]::Collect()